- Published on
Redis Cluster 구축과 운영 실전 가이드 — 샤딩, 레플리케이션, 페일오버
- Authors

- Name
- Youngju Kim
- @fjvbn20031
들어가며
단일 Redis 인스턴스는 메모리와 처리량에 한계가 있습니다. Redis Cluster는 데이터를 여러 노드에 자동으로 분산(샤딩)하고, 노드 장애 시 자동 페일오버를 제공하는 네이티브 클러스터링 솔루션입니다.
이 글에서는 Redis Cluster의 아키텍처를 이해하고, 실제 구축부터 운영까지 단계별로 살펴봅니다.
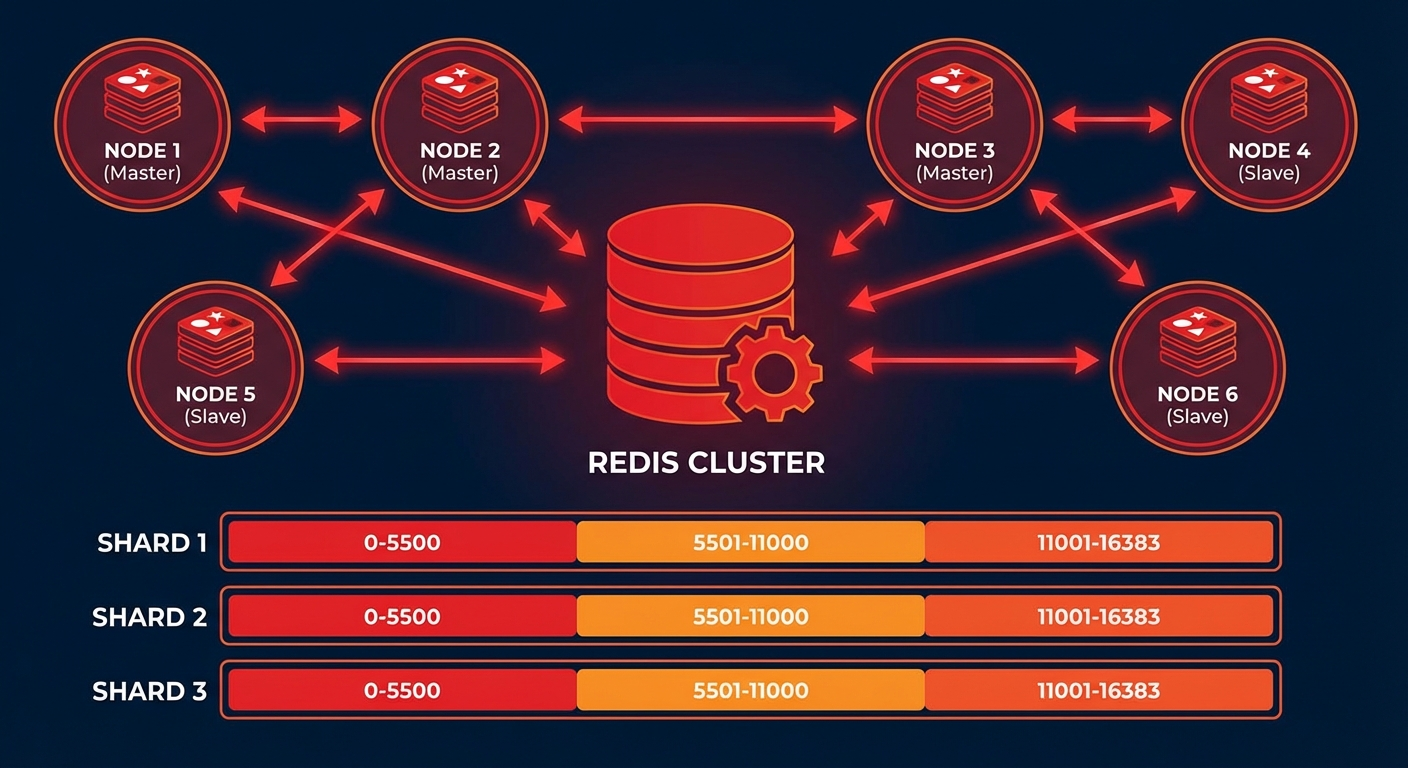
Redis Cluster 아키텍처
해시 슬롯 (Hash Slots)
Redis Cluster는 16,384개의 해시 슬롯을 사용하여 데이터를 분산합니다:
# 키의 해시 슬롯 계산
# HASH_SLOT = CRC16(key) % 16384

# 예시: 3개 마스터 노드
# Node A: 슬롯 0 ~ 5460
# Node B: 슬롯 5461 ~ 10922
# Node C: 슬롯 10923 ~ 16383
클러스터 토폴로지
# 최소 권장 구성: 3 Master + 3 Replica = 6 노드
#
# Master A (슬롯 0-5460)    ←→  Replica A'
# Master B (슬롯 5461-10922) ←→  Replica B'
# Master C (슬롯 10923-16383) ←→  Replica C'
#
# 각 Master가 다운되면 해당 Replica가 자동 승격
6노드 Redis Cluster 구축
Docker Compose로 구축
# docker-compose.yml
version: '3.8'

services:
  redis-node-1:
    image: redis:7.4
    container_name: redis-node-1
    ports:
      - '7001:7001'
      - '17001:17001'
    volumes:
      - ./redis-node-1:/data
    command: >
      redis-server
      --port 7001
      --cluster-enabled yes
      --cluster-config-file nodes.conf
      --cluster-node-timeout 5000
      --appendonly yes
      --protected-mode no
      --bind 0.0.0.0
    networks:
      redis-cluster:
        ipv4_address: 172.20.0.11

  redis-node-2:
    image: redis:7.4
    container_name: redis-node-2
    ports:
      - '7002:7002'
      - '17002:17002'
    volumes:
      - ./redis-node-2:/data
    command: >
      redis-server
      --port 7002
      --cluster-enabled yes
      --cluster-config-file nodes.conf
      --cluster-node-timeout 5000
      --appendonly yes
      --protected-mode no
      --bind 0.0.0.0
    networks:
      redis-cluster:
        ipv4_address: 172.20.0.12

  redis-node-3:
    image: redis:7.4
    container_name: redis-node-3
    ports:
      - '7003:7003'
      - '17003:17003'
    volumes:
      - ./redis-node-3:/data
    command: >
      redis-server
      --port 7003
      --cluster-enabled yes
      --cluster-config-file nodes.conf
      --cluster-node-timeout 5000
      --appendonly yes
      --protected-mode no
      --bind 0.0.0.0
    networks:
      redis-cluster:
        ipv4_address: 172.20.0.13

  redis-node-4:
    image: redis:7.4
    container_name: redis-node-4
    ports:
      - '7004:7004'
      - '17004:17004'
    volumes:
      - ./redis-node-4:/data
    command: >
      redis-server
      --port 7004
      --cluster-enabled yes
      --cluster-config-file nodes.conf
      --cluster-node-timeout 5000
      --appendonly yes
      --protected-mode no
      --bind 0.0.0.0
    networks:
      redis-cluster:
        ipv4_address: 172.20.0.14

  redis-node-5:
    image: redis:7.4
    container_name: redis-node-5
    ports:
      - '7005:7005'
      - '17005:17005'
    volumes:
      - ./redis-node-5:/data
    command: >
      redis-server
      --port 7005
      --cluster-enabled yes
      --cluster-config-file nodes.conf
      --cluster-node-timeout 5000
      --appendonly yes
      --protected-mode no
      --bind 0.0.0.0
    networks:
      redis-cluster:
        ipv4_address: 172.20.0.15

  redis-node-6:
    image: redis:7.4
    container_name: redis-node-6
    ports:
      - '7006:7006'
      - '17006:17006'
    volumes:
      - ./redis-node-6:/data
    command: >
      redis-server
      --port 7006
      --cluster-enabled yes
      --cluster-config-file nodes.conf
      --cluster-node-timeout 5000
      --appendonly yes
      --protected-mode no
      --bind 0.0.0.0
    networks:
      redis-cluster:
        ipv4_address: 172.20.0.16

networks:
  redis-cluster:
    driver: bridge
    ipam:
      config:
        - subnet: 172.20.0.0/24
# 컨테이너 시작
docker compose up -d

# 클러스터 생성 (3 master + 3 replica)
docker exec -it redis-node-1 redis-cli --cluster create \
  172.20.0.11:7001 172.20.0.12:7002 172.20.0.13:7003 \
  172.20.0.14:7004 172.20.0.15:7005 172.20.0.16:7006 \
  --cluster-replicas 1 --cluster-yes

# 클러스터 상태 확인
docker exec -it redis-node-1 redis-cli -p 7001 cluster info
docker exec -it redis-node-1 redis-cli -p 7001 cluster nodes
베어메탈/VM에서 구축
# Redis 설치 (Ubuntu)
sudo apt update && sudo apt install -y redis-server

# 노드별 설정 파일 생성
cat > /etc/redis/redis-7001.conf << 'EOF'
port 7001
cluster-enabled yes
cluster-config-file nodes-7001.conf
cluster-node-timeout 5000
appendonly yes
appendfilename "appendonly-7001.aof"
dbfilename dump-7001.rdb
dir /var/lib/redis/7001
logfile /var/log/redis/redis-7001.log
pidfile /var/run/redis/redis-7001.pid
protected-mode no
bind 0.0.0.0

# 메모리 설정
maxmemory 4gb
maxmemory-policy allkeys-lru

# 성능 튜닝
tcp-backlog 511
timeout 0
tcp-keepalive 300
EOF

# 디렉토리 생성
sudo mkdir -p /var/lib/redis/7001
sudo chown redis:redis /var/lib/redis/7001

# 서비스 시작
sudo redis-server /etc/redis/redis-7001.conf --daemonize yes

# 6개 노드 모두 시작 후 클러스터 생성
redis-cli --cluster create \
  192.168.1.1:7001 192.168.1.2:7002 192.168.1.3:7003 \
  192.168.1.4:7004 192.168.1.5:7005 192.168.1.6:7006 \
  --cluster-replicas 1
클러스터 운영
데이터 읽기/쓰기
# 클러스터 모드로 접속 (-c 플래그)
redis-cli -c -h 172.20.0.11 -p 7001

# MOVED 리다이렉션 자동 처리
172.20.0.11:7001> SET user:1000 "Kim Youngju"
-> Redirected to slot [3817] located at 172.20.0.11:7001
OK

172.20.0.11:7001> SET user:2000 "Park Minho"
-> Redirected to slot [8234] located at 172.20.0.12:7002
OK
Hash Tag로 같은 슬롯에 저장
# {user:1000} 부분만 해시 계산에 사용됨
SET {user:1000}.profile "Kim Youngju"
SET {user:1000}.email "youngju@example.com"
SET {user:1000}.settings "{\"theme\":\"dark\"}"

# 같은 슬롯에 저장되므로 MGET 가능
MGET {user:1000}.profile {user:1000}.email
Python 클라이언트
from redis.cluster import RedisCluster

# 클러스터 연결
rc = RedisCluster(
    startup_nodes=[
        {"host": "172.20.0.11", "port": 7001},
        {"host": "172.20.0.12", "port": 7002},
        {"host": "172.20.0.13", "port": 7003},
    ],
    decode_responses=True,
    skip_full_coverage_check=True
)

# 기본 작업
rc.set("user:1000", "Kim Youngju")
print(rc.get("user:1000"))

# 파이프라인 (같은 슬롯의 키만)
pipe = rc.pipeline()
pipe.set("{user:1000}.name", "Kim Youngju")
pipe.set("{user:1000}.age", "30")
pipe.get("{user:1000}.name")
results = pipe.execute()
print(results)

# 클러스터 정보
print(rc.cluster_info())
노드 추가/제거
# 새 마스터 노드 추가
redis-cli --cluster add-node 172.20.0.17:7007 172.20.0.11:7001

# 슬롯 리밸런싱
redis-cli --cluster rebalance 172.20.0.11:7001

# 새 노드에 레플리카 추가
redis-cli --cluster add-node 172.20.0.18:7008 172.20.0.11:7001 \
  --cluster-slave --cluster-master-id <master-node-id>

# 노드 제거 (먼저 슬롯을 다른 노드로 이동)
redis-cli --cluster reshard 172.20.0.11:7001 \
  --cluster-from <removing-node-id> \
  --cluster-to <target-node-id> \
  --cluster-slots 5461 \
  --cluster-yes

redis-cli --cluster del-node 172.20.0.11:7001 <removing-node-id>
자동 페일오버
페일오버 동작 과정
# 1. Master A 다운 감지 (cluster-node-timeout 초 후)
# 2. Replica A'가 다른 Master들에게 투표 요청
# 3. 과반수 Master가 승인하면 Replica A'가 Master로 승격
# 4. 새 Master A'가 기존 슬롯 담당

# 페일오버 테스트
docker stop redis-node-1

# 상태 확인 (Replica가 Master로 승격됨)
docker exec -it redis-node-2 redis-cli -p 7002 cluster nodes
수동 페일오버
# Replica에서 실행 (graceful failover)
redis-cli -h 172.20.0.14 -p 7004 CLUSTER FAILOVER

# 강제 페일오버 (Master가 다운된 경우)
redis-cli -h 172.20.0.14 -p 7004 CLUSTER FAILOVER FORCE
모니터링
핵심 메트릭
# 클러스터 상태 확인
redis-cli -p 7001 cluster info
# cluster_state:ok
# cluster_slots_assigned:16384
# cluster_slots_ok:16384
# cluster_known_nodes:6

# 노드별 메모리 사용량
redis-cli -p 7001 info memory
# used_memory_human:1.5G
# maxmemory_human:4.0G

# 슬롯 분배 확인
redis-cli --cluster check 172.20.0.11:7001
Prometheus + Grafana 모니터링
# docker-compose.monitoring.yml
services:
  redis-exporter:
    image: oliver006/redis_exporter:latest
    environment:
      - REDIS_ADDR=redis://172.20.0.11:7001
      - REDIS_CLUSTER=true
    ports:
      - '9121:9121'
# prometheus.yml
scrape_configs:
  - job_name: 'redis-cluster'
    static_configs:
      - targets: ['redis-exporter:9121']
# 주요 Grafana 대시보드 쿼리
# 초당 명령 수
rate(redis_commands_processed_total[5m])

# 메모리 사용률
redis_memory_used_bytes / redis_memory_max_bytes * 100

# 키 수
redis_db_keys

# 연결된 클라이언트 수
redis_connected_clients

# 복제 지연
redis_replication_offset
트러블슈팅
CROSSSLOT 에러
# 에러: CROSSSLOT Keys in request don't hash to the same slot
# 원인: MGET, MSET 등에서 다른 슬롯의 키를 사용

# 해결: Hash Tag 사용
MGET {order:1}.items {order:1}.total  # OK (같은 슬롯)
MGET order:1 order:2                  # ERROR (다른 슬롯 가능)
클러스터 상태 복구
# 클러스터 상태가 fail인 경우
redis-cli --cluster fix 172.20.0.11:7001

# 슬롯이 누락된 경우
redis-cli --cluster fix 172.20.0.11:7001 --cluster-fix-with-unreachable-masters
마무리
Redis Cluster 운영의 핵심:
- 최소 6노드: 3 Master + 3 Replica로 고가용성 확보
- Hash Tag 활용: 관련 키를 같은 슬롯에 배치
- 자동 페일오버: cluster-node-timeout 설정에 따라 자동 복구
- 리샤딩: 노드 추가/제거 시 슬롯 재분배
- 모니터링: Prometheus + redis_exporter로 상시 감시
📝 퀴즈 (7문제)
Q1. Redis Cluster의 해시 슬롯 개수는? 16,384개
Q2. 키의 해시 슬롯을 계산하는 공식은? CRC16(key) % 16384
Q3. Hash Tag의 역할은? 중괄호 안의 문자열만 해시 계산에 사용하여 관련 키를 같은 슬롯에 배치
Q4. 자동 페일오버 시 Replica가 Master로 승격되려면? 과반수 Master의 투표(승인)가 필요
Q5. CROSSSLOT 에러의 원인과 해결법은? 다른 슬롯의 키를 한 명령에서 사용할 때 발생. Hash Tag로 같은 슬롯에 배치하여 해결
Q6. cluster-node-timeout의 역할은? 노드 장애를 감지하는 시간. 이 시간 동안 응답이 없으면 장애로 판단
Q7. 노드 제거 시 먼저 해야 하는 작업은? 해당 노드의 슬롯을 다른 노드로 리샤딩(reshard)