- 들어가며
- OTel Collector 아키텍처
- 설치
- 파이프라인 설정
- Receiver 상세
- Processor 상세
- Kubernetes 배포
- 트러블슈팅
- 배포 전 검증: 설정 파일과 컴포넌트 확인
- 파이프라인 순서가 만드는 차이
- 운영 중 읽어야 하는 자체 지표
- 실패 사례와 진단 순서
- 언제 Collector를 두지 않나
- 참고 자료
- 마무리
- 퀴즈
들어가며
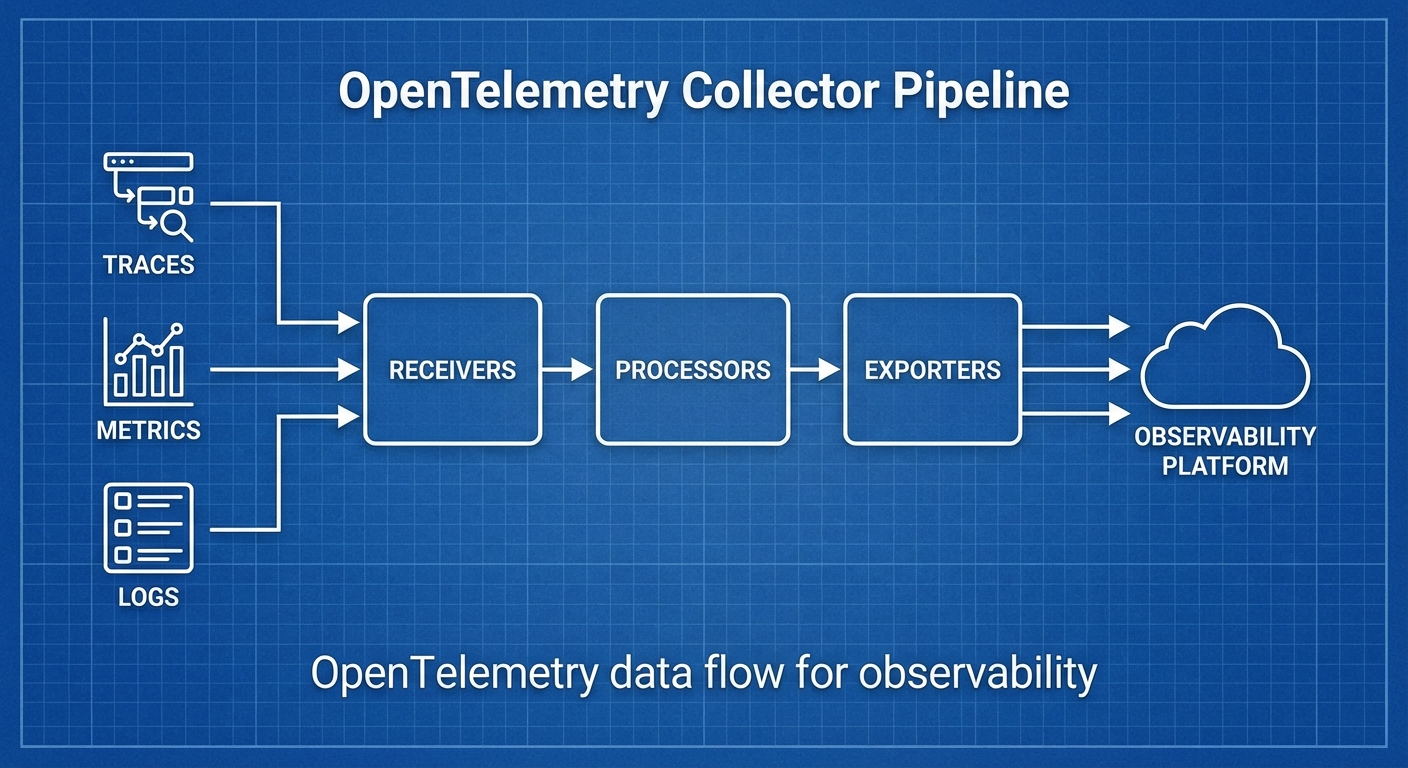
마이크로서비스 환경에서 Traces, Metrics, Logs를 통합 수집하고 처리하는 것은 Observability의 핵심입니다. OpenTelemetry Collector는 벤더 중립적인 텔레메트리 파이프라인으로, 다양한 소스에서 데이터를 수집하고 원하는 백엔드로 전송합니다.
이 글에서는 OTel Collector의 아키텍처를 이해하고, 프로덕션 환경에서의 파이프라인 설계를 다룹니다.
OTel Collector 아키텍처
파이프라인 구조
# 데이터 흐름
# Receiver → Processor → Exporter
#
# Receiver: 데이터 수집 (OTLP, Jaeger, Prometheus, Fluentd 등)
# Processor: 데이터 가공 (필터링, 변환, 배칭, 샘플링)
# Exporter: 데이터 전송 (OTLP, Jaeger, Prometheus, Loki 등)
#
# 하나의 Collector에 여러 파이프라인 구성 가능:
# - traces pipeline
# - metrics pipeline
# - logs pipeline
Collector 배포 패턴
# 패턴 1: Agent (사이드카/데몬셋)
# 각 노드/Pod에 배치, 로컬 수집

# 패턴 2: Gateway (중앙 집중)
# 클러스터 내 독립 서비스로 배치, 트래픽 집중

# 패턴 3: Agent + Gateway (권장)
# Agent가 로컬 수집 → Gateway가 중앙 처리/라우팅
설치
Kubernetes (Helm)
# OpenTelemetry Operator 설치
helm repo add open-telemetry https://open-telemetry.github.io/opentelemetry-helm-charts
helm repo update

# Collector 설치 (DaemonSet 모드)
helm install otel-collector open-telemetry/opentelemetry-collector \
  --namespace observability \
  --create-namespace \
  --values collector-values.yaml
Docker
docker run -d --name otel-collector \
  -p 4317:4317 \
  -p 4318:4318 \
  -p 8888:8888 \
  -v $(pwd)/otel-collector-config.yaml:/etc/otelcol/config.yaml \
  otel/opentelemetry-collector-contrib:0.96.0
파이프라인 설정
기본 설정 구조
# otel-collector-config.yaml
receivers:
  otlp:
    protocols:
      grpc:
        endpoint: 0.0.0.0:4317
      http:
        endpoint: 0.0.0.0:4318

processors:
  batch:
    timeout: 5s
    send_batch_size: 1000
    send_batch_max_size: 1500

exporters:
  debug:
    verbosity: detailed

service:
  pipelines:
    traces:
      receivers: [otlp]
      processors: [batch]
      exporters: [debug]
    metrics:
      receivers: [otlp]
      processors: [batch]
      exporters: [debug]
    logs:
      receivers: [otlp]
      processors: [batch]
      exporters: [debug]
프로덕션 파이프라인
# production-config.yaml
receivers:
  # OTLP (애플리케이션 SDK에서 전송)
  otlp:
    protocols:
      grpc:
        endpoint: 0.0.0.0:4317
        max_recv_msg_size_mib: 4
      http:
        endpoint: 0.0.0.0:4318
        cors:
          allowed_origins: ['*']

  # Prometheus 스크래핑
  prometheus:
    config:
      scrape_configs:
        - job_name: 'kubernetes-pods'
          kubernetes_sd_configs:
            - role: pod
          relabel_configs:
            - source_labels: [__meta_kubernetes_pod_annotation_prometheus_io_scrape]
              action: keep
              regex: true

  # 호스트 메트릭
  hostmetrics:
    collection_interval: 30s
    scrapers:
      cpu: {}
      memory: {}
      disk: {}
      network: {}
      load: {}

  # Kubernetes 이벤트
  k8s_events:
    namespaces: [default, production]

processors:
  # 배칭
  batch:
    timeout: 5s
    send_batch_size: 1000

  # 메모리 제한
  memory_limiter:
    check_interval: 1s
    limit_mib: 1500
    spike_limit_mib: 512

  # 리소스 정보 추가
  resourcedetection:
    detectors: [env, system, docker, gcp, aws, azure]
    timeout: 5s

  # K8s 메타데이터 추가
  k8sattributes:
    auth_type: serviceAccount
    extract:
      metadata:
        - k8s.namespace.name
        - k8s.deployment.name
        - k8s.pod.name
        - k8s.node.name

  # 불필요한 속성 제거
  attributes:
    actions:
      - key: http.request.header.authorization
        action: delete
      - key: db.statement
        action: hash # 민감 쿼리 해싱

  # 테일 샘플링 (traces만)
  tail_sampling:
    decision_wait: 10s
    num_traces: 100000
    policies:
      - name: error-policy
        type: status_code
        status_code:
          status_codes: [ERROR]
      - name: slow-policy
        type: latency
        latency:
          threshold_ms: 1000
      - name: probabilistic-policy
        type: probabilistic
        probabilistic:
          sampling_percentage: 10

  # 필터링
  filter:
    metrics:
      exclude:
        match_type: regexp
        metric_names:
          - 'go_.*'
          - 'process_.*'

exporters:
  # Traces → Tempo
  otlp/tempo:
    endpoint: tempo.observability.svc:4317
    tls:
      insecure: true

  # Metrics → Prometheus/Mimir
  prometheusremotewrite:
    endpoint: http://mimir.observability.svc:9009/api/v1/push
    tls:
      insecure: true
    resource_to_telemetry_conversion:
      enabled: true

  # Logs → Loki
  loki:
    endpoint: http://loki.observability.svc:3100/loki/api/v1/push
    default_labels_enabled:
      exporter: true
      job: true

  # 디버그 (문제 해결용)
  debug:
    verbosity: basic

extensions:
  # 헬스체크
  health_check:
    endpoint: 0.0.0.0:13133

  # 자체 메트릭
  zpages:
    endpoint: 0.0.0.0:55679

  # pprof (프로파일링)
  pprof:
    endpoint: 0.0.0.0:1777

service:
  extensions: [health_check, zpages, pprof]

  pipelines:
    traces:
      receivers: [otlp]
      processors:
        [memory_limiter, resourcedetection, k8sattributes, attributes, tail_sampling, batch]
      exporters: [otlp/tempo]

    metrics:
      receivers: [otlp, prometheus, hostmetrics]
      processors: [memory_limiter, resourcedetection, k8sattributes, filter, batch]
      exporters: [prometheusremotewrite]

    logs:
      receivers: [otlp, k8s_events]
      processors: [memory_limiter, resourcedetection, k8sattributes, attributes, batch]
      exporters: [loki]

  telemetry:
    logs:
      level: info
    metrics:
      address: 0.0.0.0:8888
Receiver 상세
OTLP Receiver
receivers:
  otlp:
    protocols:
      grpc:
        endpoint: 0.0.0.0:4317
        max_recv_msg_size_mib: 4
        keepalive:
          server_parameters:
            max_connection_idle: 11s
            max_connection_age: 30s
      http:
        endpoint: 0.0.0.0:4318
Filelog Receiver (로그 파일 수집)
receivers:
  filelog:
    include:
      - /var/log/pods/*/*/*.log
    exclude:
      - /var/log/pods/*/otel-collector*/*.log
    start_at: beginning
    include_file_path: true
    operators:
      - type: router
        routes:
          - output: parse_json
            expr: 'body matches "^\\{"'
          - output: parse_plain
            expr: 'body matches "^[^{]"'
      - id: parse_json
        type: json_parser
        timestamp:
          parse_from: attributes.timestamp
          layout: '%Y-%m-%dT%H:%M:%S.%fZ'
      - id: parse_plain
        type: regex_parser
        regex: '^(?P<timestamp>\S+) (?P<level>\S+) (?P<message>.*)'
Processor 상세
Tail Sampling (핵심!)
processors:
  tail_sampling:
    decision_wait: 10s
    num_traces: 100000
    expected_new_traces_per_sec: 1000
    policies:
      # 에러는 100% 수집
      - name: errors
        type: status_code
        status_code:
          status_codes: [ERROR]

      # 1초 이상 느린 요청은 100% 수집
      - name: slow-traces
        type: latency
        latency:
          threshold_ms: 1000

      # 특정 서비스는 100% 수집
      - name: critical-services
        type: string_attribute
        string_attribute:
          key: service.name
          values: [payment-service, auth-service]

      # 나머지는 5%만 수집
      - name: probabilistic
        type: probabilistic
        probabilistic:
          sampling_percentage: 5

      # 복합 정책
      - name: composite-policy
        type: composite
        composite:
          max_total_spans_per_second: 1000
          policy_order: [errors, slow-traces, critical-services, probabilistic]
          rate_allocation:
            - policy: errors
              percent: 30
            - policy: slow-traces
              percent: 30
            - policy: critical-services
              percent: 20
            - policy: probabilistic
              percent: 20
Transform Processor
processors:
  transform:
    trace_statements:
      - context: span
        statements:
          # 속성 추가
          - set(attributes["deployment.environment"], "production")
          # 속성 변환
          - replace_pattern(attributes["http.url"], "password=\\w+", "password=***")
          # 조건부 처리
          - set(attributes["error.category"], "timeout") where attributes["error.type"] == "DeadlineExceeded"

    metric_statements:
      - context: datapoint
        statements:
          - set(attributes["env"], "prod")

    log_statements:
      - context: log
        statements:
          # 로그 본문에서 정보 추출
          - set(attributes["user_id"], ExtractPatterns(body, "user_id=(?P<user_id>\\w+)"))
Kubernetes 배포
Agent (DaemonSet) + Gateway 패턴
# agent-config.yaml (DaemonSet)
apiVersion: opentelemetry.io/v1beta1
kind: OpenTelemetryCollector
metadata:
  name: otel-agent
  namespace: observability
spec:
  mode: daemonset
  config:
    receivers:
      otlp:
        protocols:
          grpc:
            endpoint: 0.0.0.0:4317
      hostmetrics:
        collection_interval: 30s
        scrapers:
          cpu: {}
          memory: {}

    processors:
      memory_limiter:
        limit_mib: 512
      batch:
        timeout: 5s

    exporters:
      # Gateway로 전송
      otlp:
        endpoint: otel-gateway.observability.svc:4317
        tls:
          insecure: true

    service:
      pipelines:
        traces:
          receivers: [otlp]
          processors: [memory_limiter, batch]
          exporters: [otlp]
        metrics:
          receivers: [otlp, hostmetrics]
          processors: [memory_limiter, batch]
          exporters: [otlp]
---
# gateway-config.yaml (Deployment)
apiVersion: opentelemetry.io/v1beta1
kind: OpenTelemetryCollector
metadata:
  name: otel-gateway
  namespace: observability
spec:
  mode: deployment
  replicas: 3
  config:
    receivers:
      otlp:
        protocols:
          grpc:
            endpoint: 0.0.0.0:4317

    processors:
      memory_limiter:
        limit_mib: 2048
      tail_sampling:
        decision_wait: 10s
        policies:
          - name: errors
            type: status_code
            status_code:
              status_codes: [ERROR]
          - name: probabilistic
            type: probabilistic
            probabilistic:
              sampling_percentage: 10
      batch:
        timeout: 10s
        send_batch_size: 5000

    exporters:
      otlp/tempo:
        endpoint: tempo.observability.svc:4317
        tls:
          insecure: true
      prometheusremotewrite:
        endpoint: http://mimir.observability.svc:9009/api/v1/push
      loki:
        endpoint: http://loki.observability.svc:3100/loki/api/v1/push

    service:
      pipelines:
        traces:
          receivers: [otlp]
          processors: [memory_limiter, tail_sampling, batch]
          exporters: [otlp/tempo]
        metrics:
          receivers: [otlp]
          processors: [memory_limiter, batch]
          exporters: [prometheusremotewrite]
        logs:
          receivers: [otlp]
          processors: [memory_limiter, batch]
          exporters: [loki]
트러블슈팅
자체 메트릭 확인
# Collector 자체 메트릭 (port 8888)
curl http://localhost:8888/metrics | grep otelcol

# 주요 메트릭:
# otelcol_receiver_accepted_spans - 수신된 span 수
# otelcol_receiver_refused_spans - 거부된 span 수
# otelcol_processor_dropped_spans - 드롭된 span 수
# otelcol_exporter_sent_spans - 전송된 span 수
# otelcol_exporter_send_failed_spans - 전송 실패 span 수
zPages로 디버깅
# http://localhost:55679/debug/tracez — 최근 trace 확인
# http://localhost:55679/debug/pipelinez — 파이프라인 상태
배포 전 검증: 설정 파일과 컴포넌트 확인
Collector 설정은 YAML 한 줄만 어긋나도 프로세스가 기동하지 못한다. 문제는 그 사실을 대부분 클러스터에서 CrashLoopBackOff를 본 뒤에야 알게 된다는 점이다. 파이프라인을 바꾸는 작업은 커밋 전에 로컬에서 끝내는 편이 훨씬 싸다.
# 설정을 파싱하고 각 컴포넌트 스키마에 맞는지 확인한 뒤 종료한다
otelcol validate --config=customconfig.yaml

# 이 바이너리에 실제로 포함된 컴포넌트와 각각의 안정성 등급을 출력한다
otelcol components
otelcol validate는 포트를 열지도 않고 데이터를 받지도 않는다. 오로지 설정만 읽고 끝나기 때문에 CI에서 돌리기에 적합하다. Helm으로 렌더링한 ConfigMap에서 설정 부분만 뽑아 이 명령에 넘기면, 파이프라인에 존재하지 않는 프로세서를 적어 넣었거나 exporter 이름의 접미사를 잘못 쓴 실수를 배포 전에 잡을 수 있다.
otelcol components는 그보다 덜 알려져 있지만 실제로 더 자주 필요하다. 설정에 적은 컴포넌트가 실행 중인 바이너리에 없으면 Collector는 알 수 없는 타입이라는 취지의 오류를 내고 죽는데, 이때 대부분은 설정 오타를 먼저 의심한다. 그러나 실제 원인은 배포판이 다른 경우가 훨씬 많다. 어떤 컴포넌트가 포함되어 있는지는 빌드마다 다르므로, 블로그 글이나 문서에서 컴포넌트 이름만 보고 그대로 붙여 넣기 전에 이 명령으로 존재 여부를 확인하는 습관이 필요하다. 출력에는 안정성 등급도 함께 나오므로, alpha 단계 컴포넌트에 프로덕션 파이프라인을 의존시키고 있지는 않은지도 같은 자리에서 판단할 수 있다.
환경마다 값이 달라지는 부분은 설정 파일을 여러 벌 만드는 대신 환경 변수 치환으로 처리한다. Collector는 env 접두사를 붙인 치환 문법을 지원하고, 콜론과 하이픈을 이어 붙이는 방식으로 기본값을 지정할 수 있다. 값 안에 달러 기호 자체가 필요하면 달러 기호를 두 번 적어 이스케이프한다.
exporters:
  otlp/backend:
    endpoint: ${env:OTLP_ENDPOINT}
    headers:
      authorization: ${env:OTLP_TOKEN:-}
명령행에서 개별 값만 덮어쓸 수도 있다. 중첩 키는 콜론 두 개로 구분해서 --set outer::inner=value 형태로 지정하고, --config를 여러 번 넘기면 설정이 병합된다. 공통 설정 한 벌에 환경별 조각을 얹는 구성을 파일 복사 없이 만들 수 있다는 뜻이다.
파이프라인 순서가 만드는 차이
문서는 파이프라인에 나열된 프로세서의 순서가 곧 신호에 적용되는 처리 순서라고 못 박는다. 짧은 문장이지만 운영에서 만드는 차이는 크다.
memory_limiter를 맨 앞에 두는 이유는 이 프로세서가 뒤로 흘려보낼 데이터의 양을 줄이는 것이 아니라, 메모리 압박이 감지되면 아예 거절해서 상류로 backpressure를 돌려주기 때문이다. 뒤쪽에 두면 이미 파싱과 변환에 메모리를 다 쓴 뒤에 거절하게 되므로 보호 효과가 사라진다.
tail_sampling은 batch보다 앞에 있어야 한다. 샘플링 결정은 trace 단위로 내려지는데, batch가 먼저 적용되면 같은 trace의 span이 서로 다른 배치로 흩어져 결정 대상이 온전하지 않게 된다. 반대로 batch는 거의 항상 마지막이다. 배치는 전송 효율을 위한 단계이므로, 그 뒤에 무언가를 더 붙이면 배치를 풀었다 다시 묶는 낭비가 생긴다.
filter와 attributes를 어디에 두느냐는 비용 문제다. 버릴 데이터를 앞에서 버릴수록 뒤 단계가 처리할 양이 줄어든다. 다만 민감 정보 제거는 순서를 반대로 생각해야 한다. k8sattributes처럼 메타데이터를 붙이는 프로세서가 새 속성을 만들어 낼 수 있으므로, 삭제나 해싱은 그 뒤에 와야 빠짐없이 적용된다.
service:
  pipelines:
    traces:
      receivers: [otlp]
      processors: [memory_limiter, k8sattributes, attributes, tail_sampling, batch]
      exporters: [otlp/tempo]
최상위 설정 섹션은 receivers, processors, exporters, connectors, extensions, service 여섯 개다. connectors는 이 글의 예제에 등장하지 않지만, 한 파이프라인의 출력을 다른 파이프라인의 입력으로 잇는 용도라서 traces에서 metrics를 뽑아내는 구성 등에 쓰인다.
운영 중 읽어야 하는 자체 지표
Collector가 내보내는 자체 지표는 프로세스가 살아 있는지가 아니라 데이터가 어느 단계에서 사라지는지를 알려준다. 파이프라인은 살아 있는데 백엔드에 데이터가 없다는 신고가 들어왔을 때 가장 먼저 보는 곳이 여기다.
curl -s http://localhost:8888/metrics | grep -E 'otelcol_(receiver|processor|exporter)_'
수신 단계는 otelcol_receiver_accepted_spans와 otelcol_receiver_refused_spans 쌍으로 본다. metric_points와 log_records 변형도 같은 이름 규칙을 따른다. refused 쪽이 올라가고 있으면 Collector가 스스로 거절하고 있다는 뜻이므로 클라이언트가 아니라 Collector를 먼저 의심해야 한다.
처리 단계는 otelcol_processor_incoming_items와 otelcol_processor_outgoing_items로 들어온 양과 나간 양을 비교한다. 과거 문서에 자주 등장하던 드롭 계열 이름은 현재 문서에는 없다. 릴리스에 따라 프로세서 지표 이름이 바뀌었으므로, 대시보드를 그대로 옮겨 붙였는데 패널이 비어 있다면 지표 이름부터 확인하는 것이 빠르다.
전송 단계에는 볼 것이 가장 많다. otelcol_exporter_sent_spans와 otelcol_exporter_send_failed_spans는 성공과 실패, otelcol_exporter_enqueue_failed_spans는 큐에 넣지도 못한 양이다. otelcol_exporter_queue_size와 otelcol_exporter_queue_capacity의 비율은 백엔드가 받아주는 속도가 유입 속도를 따라가는지를 보여주고, otelcol_exporter_in_flight_requests는 지금 몇 건이 응답을 기다리는 중인지를 보여준다. 프로세스 자체는 otelcol_process_uptime, otelcol_process_cpu_seconds, otelcol_process_memory_rss, otelcol_process_runtime_heap_alloc_bytes로 본다.
service:
  telemetry:
    logs:
      level: INFO
    metrics:
      level: normal
telemetry 아래 metrics 레벨은 none, basic, normal, detailed 중에서 고른다. detailed로 올리면 라벨 조합이 늘어나므로 카디널리티 비용을 감수할 준비가 되었을 때만 쓴다. readers 항목으로 자체 지표를 어디로 어떻게 내보낼지도 지정할 수 있고, logs 레벨의 기본값은 INFO다.
알림을 하나만 건다면 큐 지표를 고르는 것이 좋다. 큐가 용량에 붙어 있는 상태가 지속되면 그다음에 오는 것은 거의 항상 거절과 유실이기 때문이다.
실패 사례와 진단 순서
증상은 세 가지로 갈린다. 각각 확인 순서가 다르다.
첫째, 데이터가 아예 들어오지 않는다. 문서가 드는 원인은 네트워크 구성 문제, receiver 설정 오류, 클라이언트 설정 오류 세 가지다. 순서는 안쪽에서 바깥쪽으로 잡는다. 임시로 debug exporter를 붙여 receiver까지 도달했는지부터 확인하고, 도달했다면 문제는 뒤쪽에 있다.
exporters:
  debug:
    verbosity: detailed
수신 지표가 0이면 애플리케이션이 아직 아무것도 보내지 않았거나 주소를 잘못 보고 있는 것이다. 이때 흔한 원인은 gRPC와 HTTP 포트를 바꿔 적은 경우다. SDK가 4318로 보내는데 Collector는 4317만 열어 두었으면 연결 자체가 실패하고, 애플리케이션 로그에만 오류가 남아 Collector 쪽에서는 아무 흔적도 보이지 않는다.
둘째, 들어오긴 하는데 백엔드에 보이지 않는다. 문서는 Collector가 과소 사이징되어 받는 속도를 처리와 전송이 따라가지 못하는 경우와, 목적지가 사용 불가이거나 너무 느리게 받는 경우를 든다. 전송 실패 지표를 먼저 보고, 실패가 없는데도 사라진다면 큐 지표와 거절 지표를 본다.
curl -s http://localhost:8888/metrics | grep -E 'queue_size|queue_capacity|refused|send_failed'
여기서 tail_sampling이 원인인 경우가 꽤 많다. 샘플링 정책이 의도한 것보다 공격적이면 데이터는 정상적으로 전송되었는데 백엔드에서 특정 trace만 없는 모양이 된다. 지표는 아무 이상도 보고하지 않으므로, 파이프라인에서 tail_sampling을 잠시 빼고 재현되는지 보는 것이 가장 빠른 구분법이다.
셋째, Collector가 주기적으로 죽는다. 메모리 압박이 원인일 때가 대부분이고, 문서도 memory_limiter 설정을 해결책으로 지목한다. 이미 설정되어 있는데도 죽는다면 한도가 컨테이너 메모리 제한과 맞지 않는 경우를 의심한다. 컨테이너 한도보다 memory_limiter 한도가 높으면 프로세서가 개입하기 전에 커널이 먼저 프로세스를 죽인다.
더 깊이 들어가야 할 때 쓰는 도구는 두 가지다. zPages 확장은 55679 포트에서 최근 trace를 보여주는 엔드포인트를 제공하고, pprof 확장은 1777 포트에서 실행 중인 Collector를 프로파일링할 수 있게 해 준다. 메모리가 어디에서 늘어나는지 추정만 하고 있다면 pprof를 먼저 붙이는 편이 낫다.
언제 Collector를 두지 않나
Collector는 공짜가 아니다. 프로세스 하나가 더 늘어나고, 그 프로세스가 죽으면 텔레메트리가 끊긴다. 백엔드 하나만 쓰고 있고 SDK가 그 백엔드로 직접 보낼 수 있으며 샘플링이나 속성 가공이 필요 없다면, Collector를 넣는 것은 장애 지점을 하나 더 만드는 일에 가깝다.
Agent와 Gateway를 둘 다 두는 구성도 마찬가지다. 노드가 몇 대뿐이고 트래픽이 크지 않다면 Gateway 한 계층으로 충분하다. Agent 계층은 노드 로컬에서 수집해야 하는 신호가 있을 때, 즉 hostmetrics나 filelog처럼 노드에 붙어야만 얻을 수 있는 데이터가 있을 때 값을 한다.
tail_sampling은 특히 신중하게 도입할 대상이다. 결정을 내리려면 같은 trace의 span이 한 Collector 인스턴스에 모여야 하므로, Gateway를 여러 대로 늘리는 순간 로드밸런싱 방식까지 함께 설계해야 한다. 이 조건을 만족시킬 준비가 되어 있지 않다면, 비용 절감 효과를 노리고 tail_sampling을 켜는 것보다 SDK 쪽 확률 샘플링이 훨씬 덜 위험하다.
마지막으로, Collector는 데이터 품질 문제를 고쳐 주지 않는다. 계측이 잘못되어 있거나 서비스 이름이 뒤죽박죽인 상태에서 transform 프로세서로 사후 보정을 쌓기 시작하면, 설정 파일이 애플리케이션의 버그 목록이 된다. 그 보정은 애플리케이션 쪽에서 고치는 것이 맞다.
참고 자료
- OpenTelemetry Collector — Configuration: https://opentelemetry.io/docs/collector/configuration/ (2026-08-16 확인)
- OpenTelemetry Collector — Internal telemetry: https://opentelemetry.io/docs/collector/internal-telemetry/ (2026-08-16 확인)
- OpenTelemetry Collector — Troubleshooting: https://opentelemetry.io/docs/collector/troubleshooting/ (2026-08-16 확인)
마무리
OpenTelemetry Collector 파이프라인 설계의 핵심:
- Agent + Gateway 패턴: 로컬 수집 + 중앙 처리로 효율적 운영
- Tail Sampling: 에러/느린 요청 100%, 나머지 확률 샘플링으로 비용 절감
- Memory Limiter 필수: OOM 방지를 위한 메모리 제한
- Processor 순서 중요: memory_limiter → sampling → batch 순서 권장
- 벤더 중립: 백엔드 변경 시 Exporter만 교체
퀴즈
📝 퀴즈 (6문제)
Q1. OTel Collector 파이프라인의 세 가지 구성 요소는? Receiver, Processor, Exporter
Q2. Agent + Gateway 패턴에서 각각의 역할은? Agent: 각 노드에서 로컬 수집, Gateway: 중앙에서 처리/라우팅/전송
Q3. Tail Sampling이 Head Sampling보다 나은 이유는? 전체 trace를 본 후 샘플링 결정하므로 에러/느린 요청을 놓치지 않음
Q4. memory_limiter Processor를 파이프라인 첫 번째에 두는 이유는? 수신 데이터가 많을 때 OOM을 방지하기 위해 가장 먼저 메모리를 체크
Q5. Collector의 자체 메트릭을 확인하는 방법은? port 8888의 /metrics 엔드포인트 또는 zPages (port 55679)
Q6. batch Processor의 timeout과 send_batch_size의 관계는? timeout 시간이 되거나 send_batch_size에 도달하면 배치를 전송 (먼저 발생하는 조건)
현재 단락 (1/420)
마이크로서비스 환경에서 **Traces, Metrics, Logs**를 통합 수집하고 처리하는 것은 Observability의 핵심입니다. **OpenTelemetry Collec...