Split View: HBase fully distributed mode Ubuntu 22.04에 설치하는 법
HBase fully distributed mode Ubuntu 22.04에 설치하는 법
Overview
HBase를 fully distributed mode로 설치하는 방법에 대해서 알아보겠습니다.
HBase는 저장소로 Hadoop File system, S3, Local File system을 사용할 수 있습니다. 가장 많이 널리 사용되는 저장소는 HDFS입니다. HBase는 Zookeeper에 의존성이 있기 때문에 HBase설치 전 Hadoop과 Zookeeper를 미리 설치한 후에, 구축해야합니다. HBase에서 자체적으로 Zookeeper를 내포하고 있기 때문에 bundle된 binary를 사용해도 되지만, 따로 설치하는 방법을 선택하였습니다.
Hadoop 3.3.2설치
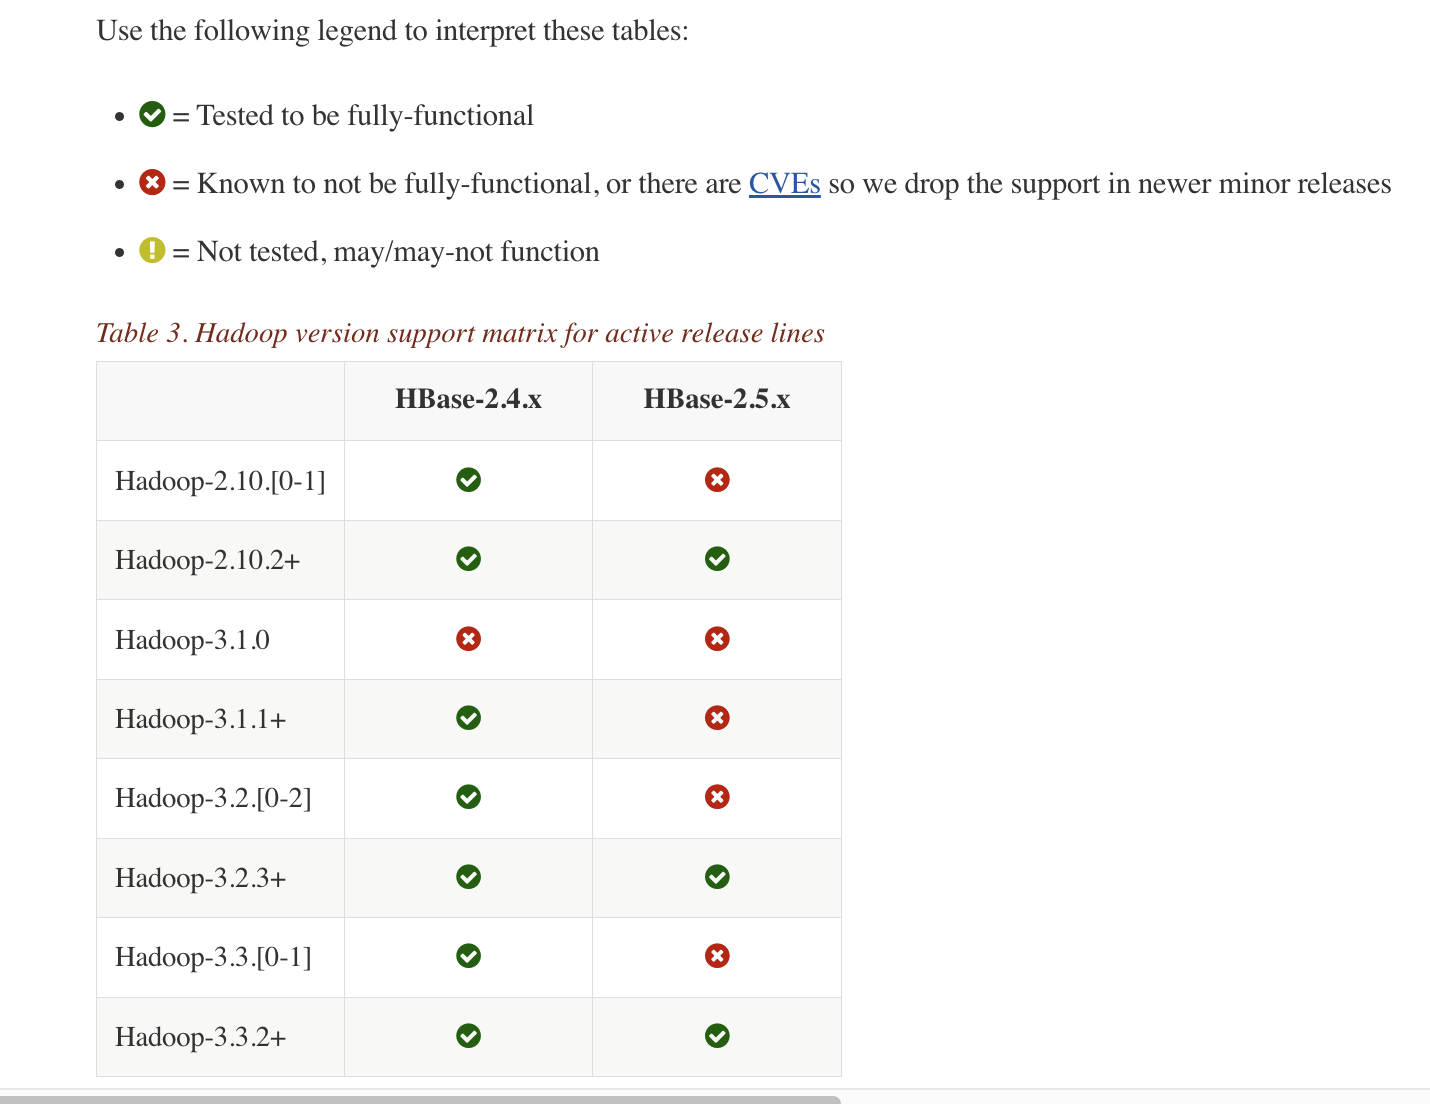
hadoop hbase version 에 보시면 HBase 버젼과 호환되는 Hadoop 버젼이 명시되어있습니다. HBase 2.5.3 version을 사용할 것이기 때문에 Hadoop 3.3.2 version을 설치하겠습니다.
hadoop 3.3.2 archive 사이트에 접속합니다.
hadoop binary downlaod
아래처럼 hadoop hadoop-3.3.2.tar.gz 부분을 우클릭 하여, copy link address를 눌러 다운로드 주소를 복사합니다.
모든 서버에서 아래와 같은 명령어로 hadoop 설치를 진행합니다.
wget https://archive.apache.org/dist/hadoop/common/hadoop-3.3.2/hadoop-3.3.2.tar.gz
tar -zxvf hadoop-3.3.2.tar.gz
sudo cp -r hadoop-3.3.2 /usr/local/hadoop
이후 설치과정은 Hadoop 3.4 Install on Ubuntu Non Secure 를 참조해 설치합니다.
변경된 config는 아래와 같습니다.
127.0.0.1       localhost
255.255.255.255 broadcasthost
::1             localhost
192.168.219.121 latte01
192.168.219.122 latte02
192.168.219.123 latte03
192.168.219.124 latte04
export JAVA_HOME=/usr/lib/jvm/java-8-openjdk-amd64
export HDFS_NAMENODE_USER=root
export HDFS_SECONDARYNAMENODE_USER=root
export HDFS_DATANODE_USER=root
export YARN_RESOURCEMANAGER_USER=root
export YARN_NODEMANAGER_USER=root
<configuration>
        <property>
                <name>dfs.replication</name>
                <value>3</value>
        </property>
        <property>
                <name>dfs.permissions.enabled</name>
                <value>false</value>
        </property>
        <property>
                <name>dfs.webhdfs.enabled</name>
                <value>true</value>
        </property>
                <property>
                    <name>dfs.namenode.name.dir</name>
                    <value>/dfs/nn</value>
            </property>
            <property>
                    <name>dfs.datanode.data.dir</name>
                    <value>/dfs/dn</value>
            </property>
</configuration>
<configuration>
    <property>
      <name>yarn.nodemanager.aux-services</name>
      <value>mapreduce_shuffle</value>
    </property>
    <property>
      <name>yarn.nodemanager.aux-services.mapreduce.shuffle.class</name>
      <value>org.apache.hadoop.mapred.ShuffleHandler</value>
    </property>
    <property>
      <name>yarn.resourcemanager.resource-tracker.address</name>
      <value>latte01:8025</value>
    </property>
    <property>
      <name>yarn.resourcemanager.scheduler.address</name>
      <value>latte01:8030</value>
    </property>
    <property>
      <name>yarn.resourcemanager.address</name>
      <value>latte01:8040</value>
    </property>
</configuration>
<configuration>
  <property>
    <name>mapreduce.framework.name</name>
    <value>yarn</value>
  </property>
  <property>
    <name>yarn.app.mapreduce.am.env</name>
    <value>HADOOP_MAPRED_HOME=${HADOOP_HOME}</value>
  </property>
  <property>
    <name>mapreduce.map.env</name>
    <value>HADOOP_MAPRED_HOME=${HADOOP_HOME}</value>
  </property>
  <property>
    <name>mapreduce.reduce.env</name>
    <value>HADOOP_MAPRED_HOME=${HADOOP_HOME}</value>
  </property>
</configuration>
latte02
latte03
latte04
hadoop 실행
start-dfs.sh
Zookeeper 설치
설치방법은 zookeeper 설치 방법 포스팅 - 눈가락 을 참조한다.
# The number of milliseconds of each tick
tickTime=2000
# The number of ticks that the initial
# synchronization phase can take
initLimit=10
# The number of ticks that can pass between
# sending a request and getting an acknowledgement
syncLimit=5
# the directory where the snapshot is stored.
# do not use /tmp for storage, /tmp here is just
# example sakes.
dataDir=/var/zookeeper
# the port at which the clients will connect
clientPort=2181
# the maximum number of client connections.
# increase this if you need to handle more clients
#maxClientCnxns=60
#
# Be sure to read the maintenance section of the
# administrator guide before turning on autopurge.
#
# http://zookeeper.apache.org/doc/current/zookeeperAdmin.html#sc_maintenance
#
# The number of snapshots to retain in dataDir
#autopurge.snapRetainCount=3
# Purge task interval in hours
# Set to "0" to disable auto purge feature
#autopurge.purgeInterval=1
server.1=latte01:2888:3888
server.2=latte02:2888:3888
server.3=latte03:2888:3888
1번, 2번, 3번 서버에 /var/zookeeper 에 myid 파일생성하여, 파일 내부에 1~255 사이의 겹치지 않는 정수를 입력해줍니다.
이후 아래 명령어로 zookeeper 서버를 실행시킵니다.
zkServer.sh start
HBase 설치
hbase downlad page 에서 2.5.3 version의 binary 링크로 이동.
https://dlcdn.apache.org/hbase/2.5.3/hbase-2.5.3-bin.tar.gz 부분을 우클릭 하여 link 주소를 클립보드에 복사.
모든 서버에서 아래 명령어로 hbase binary tar파일을 다운로드하고, 압축해제를 합니다.
wget https://www.apache.org/dyn/closer.lua/hbase/2.5.3/hbase-2.5.3-bin.tar.gz

tar -zxvf hbase-2.5.3-bin.tar.gz

sudo cp -r hbase-2.5.3 /usr/local/hbase
config 수정
hbase-env.sh에 아래 두 줄 추가.
export JAVA_HOME=/usr/lib/jvm/java-8-openjdk-amd64
export HBASE_CLASSPATH=${HADOOP_CONF_DIR}
export HBASE_PID_DIR=/var/hadoop/pids
export HBASE_MANAGES_ZK=false
hbase-site.xml을 아래와 같이 수정.
<configuration>
  <property>
    <name>hbase.cluster.distributed</name>
    <value>true</value>
  </property>
  <property>
    <name>hbase.rootdir</name>
    <value>hdfs://latte01:9000/hbase</value>
  </property>
  <property>
    <name>hbase.unsafe.stream.capability.enforce</name>
    <value>false</value>
  </property>
  <property>
        <name>hbase.master.port</name>
        <value>60000</value>
  </property>
  <property>
        <name>hbase.master.info.port</name>
        <value>60010</value>
  </property>
  <property>
        <name>hbase.regionserver.info.bindAddress</name>
        <value>0.0.0.0</value>
  </property>
  <property>
        <name>hbase.regionserver.port</name>
        <value>60020</value>
  </property>
  <property>
    <name>hbase.regionserver.info.port</name>
    <value>60030</value>
  </property>
  <property>
	  <name>hbase.zookeeper.quorum</name>
	  <value>latte01,latte02,latte03</value>
  </property>
  <property>
    <name>hbase.zookeeper.property.clientPort</name>
    <value>2181</value>
  </property>
  <property>
    <name>hbase.wal.provider</name>
    <value>filesystem</value>
  </property>
</configuration>
latte02
latte03
latte04
hbase 실행
start-hbase.sh
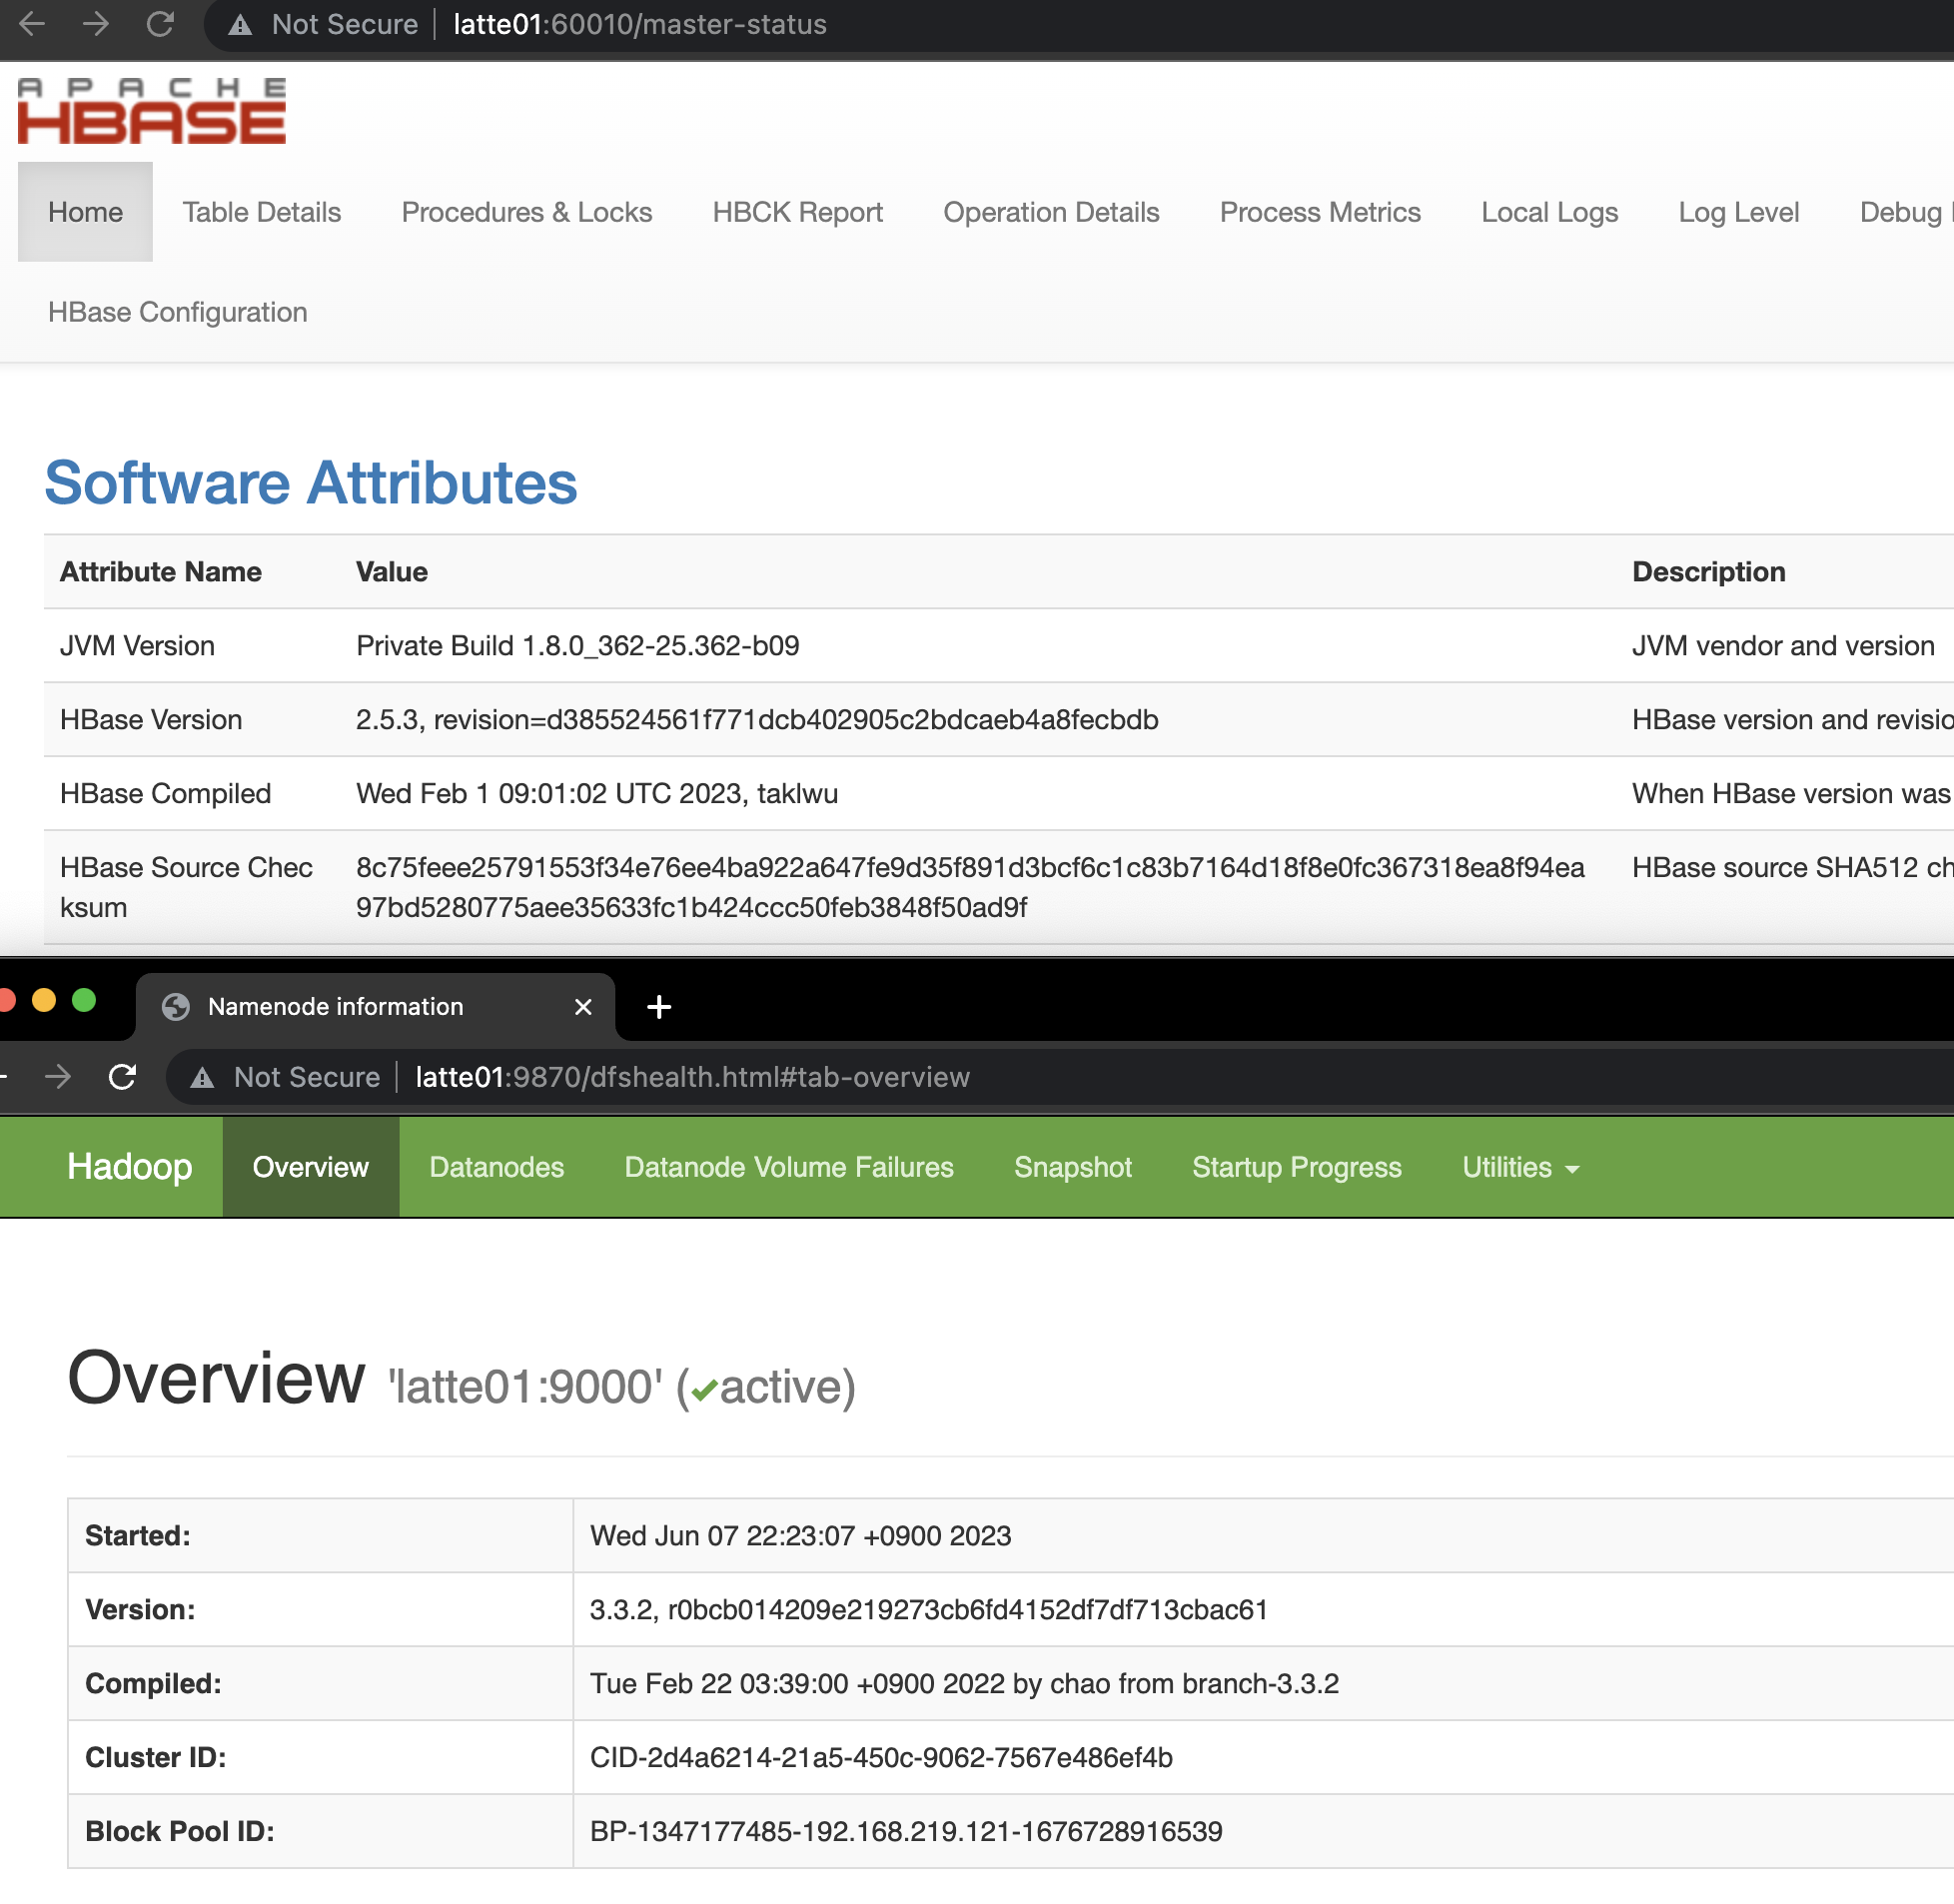
HBase 실행확인.
http://latte01:16010 에 접속하여 hbase 상태 확인
How to Install HBase Fully Distributed Mode on Ubuntu 22.04
Overview
Let's learn how to install HBase in fully distributed mode.
HBase can use Hadoop File System, S3, or Local File System as its storage. The most widely used storage is HDFS. Since HBase has a dependency on Zookeeper, you need to install Hadoop and Zookeeper before setting up HBase. HBase includes Zookeeper internally, so you can use the bundled binary, but I chose to install it separately.
Installing Hadoop 3.3.2
You can find the Hadoop version compatible with your HBase version at hadoop hbase version. Since we will be using HBase 2.5.3, we will install Hadoop 3.3.2.
Go to the hadoop 3.3.2 archive site.
Hadoop Binary Download
Right-click on the hadoop-3.3.2.tar.gz link as shown below and click "Copy Link Address" to copy the download URL.
Run the following commands on all servers to install Hadoop.
wget https://archive.apache.org/dist/hadoop/common/hadoop-3.3.2/hadoop-3.3.2.tar.gz
tar -zxvf hadoop-3.3.2.tar.gz
sudo cp -r hadoop-3.3.2 /usr/local/hadoop
For the subsequent installation process, refer to Hadoop 3.4 Install on Ubuntu Non Secure.
The modified configs are as follows.
127.0.0.1       localhost
255.255.255.255 broadcasthost
::1             localhost
192.168.219.121 latte01
192.168.219.122 latte02
192.168.219.123 latte03
192.168.219.124 latte04
export JAVA_HOME=/usr/lib/jvm/java-8-openjdk-amd64
export HDFS_NAMENODE_USER=root
export HDFS_SECONDARYNAMENODE_USER=root
export HDFS_DATANODE_USER=root
export YARN_RESOURCEMANAGER_USER=root
export YARN_NODEMANAGER_USER=root
<configuration>
        <property>
                <name>dfs.replication</name>
                <value>3</value>
        </property>
        <property>
                <name>dfs.permissions.enabled</name>
                <value>false</value>
        </property>
        <property>
                <name>dfs.webhdfs.enabled</name>
                <value>true</value>
        </property>
                <property>
                    <name>dfs.namenode.name.dir</name>
                    <value>/dfs/nn</value>
            </property>
            <property>
                    <name>dfs.datanode.data.dir</name>
                    <value>/dfs/dn</value>
            </property>
</configuration>
<configuration>
    <property>
      <name>yarn.nodemanager.aux-services</name>
      <value>mapreduce_shuffle</value>
    </property>
    <property>
      <name>yarn.nodemanager.aux-services.mapreduce.shuffle.class</name>
      <value>org.apache.hadoop.mapred.ShuffleHandler</value>
    </property>
    <property>
      <name>yarn.resourcemanager.resource-tracker.address</name>
      <value>latte01:8025</value>
    </property>
    <property>
      <name>yarn.resourcemanager.scheduler.address</name>
      <value>latte01:8030</value>
    </property>
    <property>
      <name>yarn.resourcemanager.address</name>
      <value>latte01:8040</value>
    </property>
</configuration>
<configuration>
  <property>
    <name>mapreduce.framework.name</name>
    <value>yarn</value>
  </property>
  <property>
    <name>yarn.app.mapreduce.am.env</name>
    <value>HADOOP_MAPRED_HOME=${HADOOP_HOME}</value>
  </property>
  <property>
    <name>mapreduce.map.env</name>
    <value>HADOOP_MAPRED_HOME=${HADOOP_HOME}</value>
  </property>
  <property>
    <name>mapreduce.reduce.env</name>
    <value>HADOOP_MAPRED_HOME=${HADOOP_HOME}</value>
  </property>
</configuration>
latte02
latte03
latte04
Starting Hadoop
start-dfs.sh
Installing Zookeeper
For the installation method, refer to the Zookeeper installation guide post.
# The number of milliseconds of each tick
tickTime=2000
# The number of ticks that the initial
# synchronization phase can take
initLimit=10
# The number of ticks that can pass between
# sending a request and getting an acknowledgement
syncLimit=5
# the directory where the snapshot is stored.
# do not use /tmp for storage, /tmp here is just
# example sakes.
dataDir=/var/zookeeper
# the port at which the clients will connect
clientPort=2181
# the maximum number of client connections.
# increase this if you need to handle more clients
#maxClientCnxns=60
#
# Be sure to read the maintenance section of the
# administrator guide before turning on autopurge.
#
# http://zookeeper.apache.org/doc/current/zookeeperAdmin.html#sc_maintenance
#
# The number of snapshots to retain in dataDir
#autopurge.snapRetainCount=3
# Purge task interval in hours
# Set to "0" to disable auto purge feature
#autopurge.purgeInterval=1
server.1=latte01:2888:3888
server.2=latte02:2888:3888
server.3=latte03:2888:3888
Create a myid file in /var/zookeeper on servers 1, 2, and 3, and enter a unique integer between 1 and 255 inside the file.
Then start the Zookeeper server with the following command.
zkServer.sh start
Installing HBase
Go to the hbase download page and navigate to the binary link for version 2.5.3.
Right-click on https://dlcdn.apache.org/hbase/2.5.3/hbase-2.5.3-bin.tar.gz and copy the link address to your clipboard.
Download the HBase binary tar file and extract it on all servers using the following commands.
wget https://www.apache.org/dyn/closer.lua/hbase/2.5.3/hbase-2.5.3-bin.tar.gz

tar -zxvf hbase-2.5.3-bin.tar.gz

sudo cp -r hbase-2.5.3 /usr/local/hbase
Modifying Config
Add the following two lines to hbase-env.sh.
export JAVA_HOME=/usr/lib/jvm/java-8-openjdk-amd64
export HBASE_CLASSPATH=${HADOOP_CONF_DIR}
export HBASE_PID_DIR=/var/hadoop/pids
export HBASE_MANAGES_ZK=false
Modify hbase-site.xml as follows.
<configuration>
  <property>
    <name>hbase.cluster.distributed</name>
    <value>true</value>
  </property>
  <property>
    <name>hbase.rootdir</name>
    <value>hdfs://latte01:9000/hbase</value>
  </property>
  <property>
    <name>hbase.unsafe.stream.capability.enforce</name>
    <value>false</value>
  </property>
  <property>
        <name>hbase.master.port</name>
        <value>60000</value>
  </property>
  <property>
        <name>hbase.master.info.port</name>
        <value>60010</value>
  </property>
  <property>
        <name>hbase.regionserver.info.bindAddress</name>
        <value>0.0.0.0</value>
  </property>
  <property>
        <name>hbase.regionserver.port</name>
        <value>60020</value>
  </property>
  <property>
    <name>hbase.regionserver.info.port</name>
    <value>60030</value>
  </property>
  <property>
	  <name>hbase.zookeeper.quorum</name>
	  <value>latte01,latte02,latte03</value>
  </property>
  <property>
    <name>hbase.zookeeper.property.clientPort</name>
    <value>2181</value>
  </property>
  <property>
    <name>hbase.wal.provider</name>
    <value>filesystem</value>
  </property>
</configuration>
latte02
latte03
latte04
Starting HBase
start-hbase.sh
Verifying HBase is Running
Access http://latte01:16010 to check the HBase status.
Quiz
Q1: What is the main topic covered in "How to Install HBase Fully Distributed Mode on Ubuntu
22.04"?
Learn how to install HBase in fully distributed mode on Ubuntu 22.04.
Q2: What are the key steps for Installing Hadoop 3.3.2?
You can find the Hadoop version compatible with your HBase version at hadoop hbase version. Since
we will be using HBase 2.5.3, we will install Hadoop 3.3.2. Go to the hadoop 3.3.2 archive site.
Q3: What are the key steps for Installing Zookeeper?
For the installation method, refer to the Zookeeper installation guide post. Create a myid file in
/var/zookeeper on servers 1, 2, and 3, and enter a unique integer between 1 and 255 inside the
file. Then start the Zookeeper server with the following command.
Q4: What are the key steps for Installing HBase?
Go to the hbase download page and navigate to the binary link for version 2.5.3. Right-click on
https://dlcdn.apache.org/hbase/2.5.3/hbase-2.5.3-bin.tar.gz and copy the link address to your
clipboard.