- Authors
- Name
Overview
Let's learn how to install HBase in fully distributed mode.
HBase can use Hadoop File System, S3, or Local File System as its storage. The most widely used storage is HDFS. Since HBase has a dependency on Zookeeper, you need to install Hadoop and Zookeeper before setting up HBase. HBase includes Zookeeper internally, so you can use the bundled binary, but I chose to install it separately.
Installing Hadoop 3.3.2
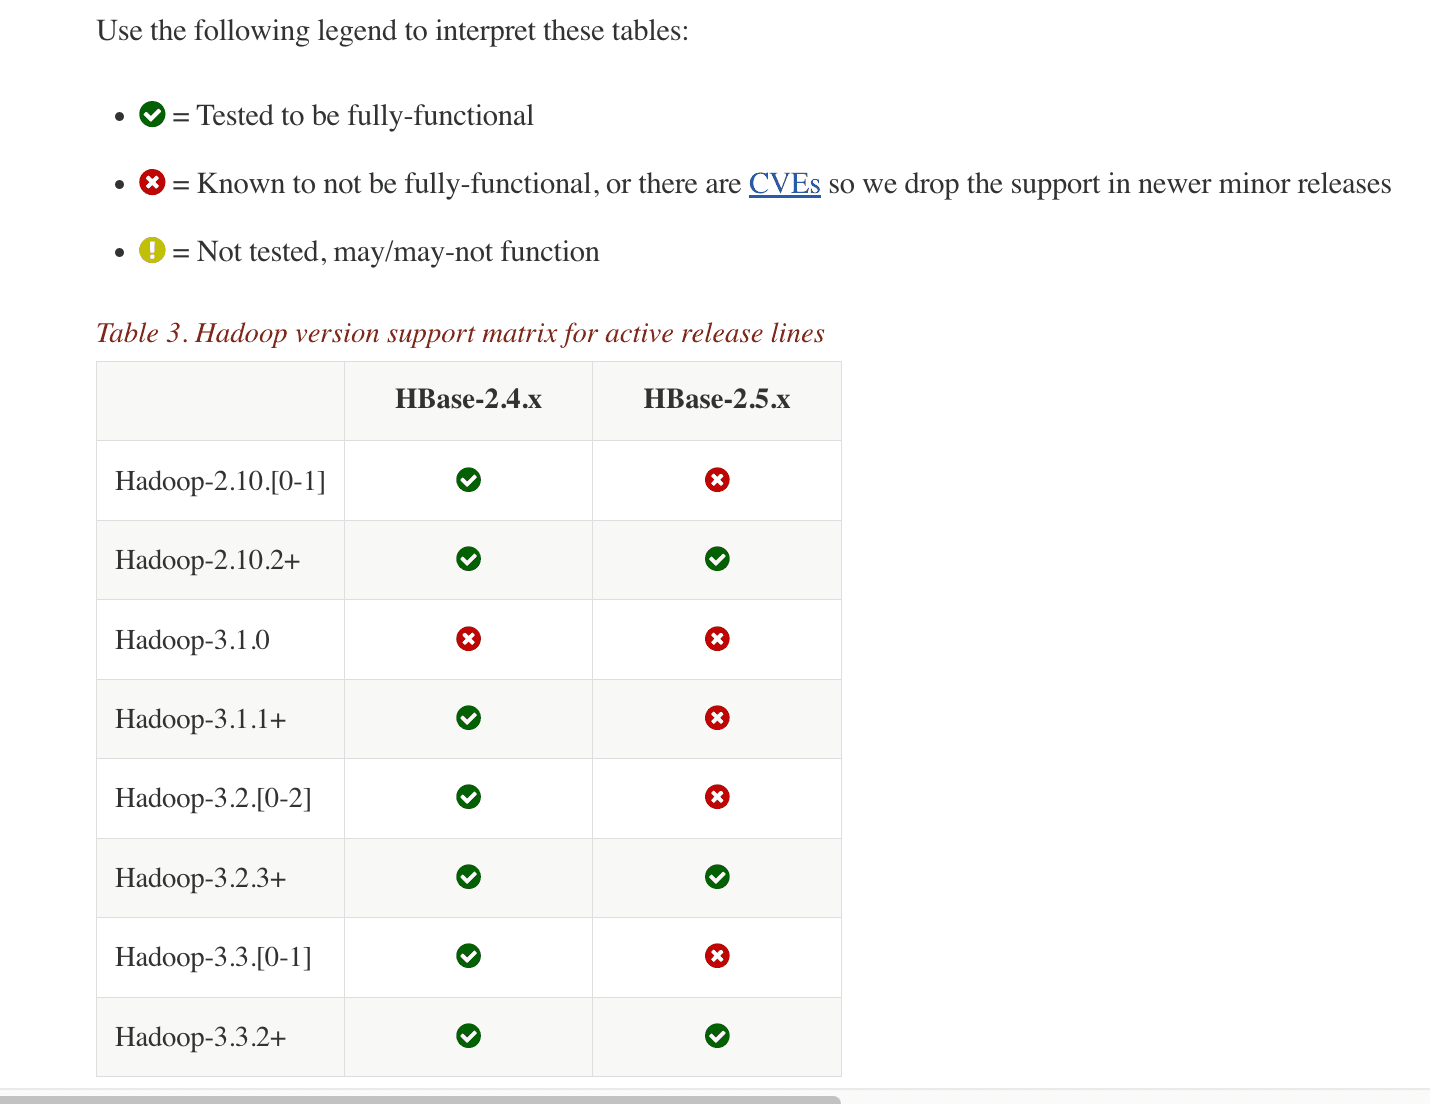
You can find the Hadoop version compatible with your HBase version at hadoop hbase version. Since we will be using HBase 2.5.3, we will install Hadoop 3.3.2.
Go to the hadoop 3.3.2 archive site.
Hadoop Binary Download
Right-click on the hadoop-3.3.2.tar.gz link as shown below and click "Copy Link Address" to copy the download URL.
Run the following commands on all servers to install Hadoop.
wget https://archive.apache.org/dist/hadoop/common/hadoop-3.3.2/hadoop-3.3.2.tar.gz
tar -zxvf hadoop-3.3.2.tar.gz
sudo cp -r hadoop-3.3.2 /usr/local/hadoop
For the subsequent installation process, refer to Hadoop 3.4 Install on Ubuntu Non Secure.
The modified configs are as follows.
127.0.0.1       localhost
255.255.255.255 broadcasthost
::1             localhost
192.168.219.121 latte01
192.168.219.122 latte02
192.168.219.123 latte03
192.168.219.124 latte04
export JAVA_HOME=/usr/lib/jvm/java-8-openjdk-amd64
export HDFS_NAMENODE_USER=root
export HDFS_SECONDARYNAMENODE_USER=root
export HDFS_DATANODE_USER=root
export YARN_RESOURCEMANAGER_USER=root
export YARN_NODEMANAGER_USER=root
<configuration>
        <property>
                <name>dfs.replication</name>
                <value>3</value>
        </property>
        <property>
                <name>dfs.permissions.enabled</name>
                <value>false</value>
        </property>
        <property>
                <name>dfs.webhdfs.enabled</name>
                <value>true</value>
        </property>
                <property>
                    <name>dfs.namenode.name.dir</name>
                    <value>/dfs/nn</value>
            </property>
            <property>
                    <name>dfs.datanode.data.dir</name>
                    <value>/dfs/dn</value>
            </property>
</configuration>
<configuration>
    <property>
      <name>yarn.nodemanager.aux-services</name>
      <value>mapreduce_shuffle</value>
    </property>
    <property>
      <name>yarn.nodemanager.aux-services.mapreduce.shuffle.class</name>
      <value>org.apache.hadoop.mapred.ShuffleHandler</value>
    </property>
    <property>
      <name>yarn.resourcemanager.resource-tracker.address</name>
      <value>latte01:8025</value>
    </property>
    <property>
      <name>yarn.resourcemanager.scheduler.address</name>
      <value>latte01:8030</value>
    </property>
    <property>
      <name>yarn.resourcemanager.address</name>
      <value>latte01:8040</value>
    </property>
</configuration>
<configuration>
  <property>
    <name>mapreduce.framework.name</name>
    <value>yarn</value>
  </property>
  <property>
    <name>yarn.app.mapreduce.am.env</name>
    <value>HADOOP_MAPRED_HOME=${HADOOP_HOME}</value>
  </property>
  <property>
    <name>mapreduce.map.env</name>
    <value>HADOOP_MAPRED_HOME=${HADOOP_HOME}</value>
  </property>
  <property>
    <name>mapreduce.reduce.env</name>
    <value>HADOOP_MAPRED_HOME=${HADOOP_HOME}</value>
  </property>
</configuration>
latte02
latte03
latte04
Starting Hadoop
start-dfs.sh
Installing Zookeeper
For the installation method, refer to the Zookeeper installation guide post.
# The number of milliseconds of each tick
tickTime=2000
# The number of ticks that the initial
# synchronization phase can take
initLimit=10
# The number of ticks that can pass between
# sending a request and getting an acknowledgement
syncLimit=5
# the directory where the snapshot is stored.
# do not use /tmp for storage, /tmp here is just
# example sakes.
dataDir=/var/zookeeper
# the port at which the clients will connect
clientPort=2181
# the maximum number of client connections.
# increase this if you need to handle more clients
#maxClientCnxns=60
#
# Be sure to read the maintenance section of the
# administrator guide before turning on autopurge.
#
# http://zookeeper.apache.org/doc/current/zookeeperAdmin.html#sc_maintenance
#
# The number of snapshots to retain in dataDir
#autopurge.snapRetainCount=3
# Purge task interval in hours
# Set to "0" to disable auto purge feature
#autopurge.purgeInterval=1
server.1=latte01:2888:3888
server.2=latte02:2888:3888
server.3=latte03:2888:3888
Create a myid file in /var/zookeeper on servers 1, 2, and 3, and enter a unique integer between 1 and 255 inside the file.
Then start the Zookeeper server with the following command.
zkServer.sh start
Installing HBase
Go to the hbase download page and navigate to the binary link for version 2.5.3.
Right-click on https://dlcdn.apache.org/hbase/2.5.3/hbase-2.5.3-bin.tar.gz and copy the link address to your clipboard.
Download the HBase binary tar file and extract it on all servers using the following commands.
wget https://www.apache.org/dyn/closer.lua/hbase/2.5.3/hbase-2.5.3-bin.tar.gz

tar -zxvf hbase-2.5.3-bin.tar.gz

sudo cp -r hbase-2.5.3 /usr/local/hbase
Modifying Config
Add the following two lines to hbase-env.sh.
export JAVA_HOME=/usr/lib/jvm/java-8-openjdk-amd64
export HBASE_CLASSPATH=${HADOOP_CONF_DIR}
export HBASE_PID_DIR=/var/hadoop/pids
export HBASE_MANAGES_ZK=false
Modify hbase-site.xml as follows.
<configuration>
  <property>
    <name>hbase.cluster.distributed</name>
    <value>true</value>
  </property>
  <property>
    <name>hbase.rootdir</name>
    <value>hdfs://latte01:9000/hbase</value>
  </property>
  <property>
    <name>hbase.unsafe.stream.capability.enforce</name>
    <value>false</value>
  </property>
  <property>
        <name>hbase.master.port</name>
        <value>60000</value>
  </property>
  <property>
        <name>hbase.master.info.port</name>
        <value>60010</value>
  </property>
  <property>
        <name>hbase.regionserver.info.bindAddress</name>
        <value>0.0.0.0</value>
  </property>
  <property>
        <name>hbase.regionserver.port</name>
        <value>60020</value>
  </property>
  <property>
    <name>hbase.regionserver.info.port</name>
    <value>60030</value>
  </property>
  <property>
	  <name>hbase.zookeeper.quorum</name>
	  <value>latte01,latte02,latte03</value>
  </property>
  <property>
    <name>hbase.zookeeper.property.clientPort</name>
    <value>2181</value>
  </property>
  <property>
    <name>hbase.wal.provider</name>
    <value>filesystem</value>
  </property>
</configuration>
latte02
latte03
latte04
Starting HBase
start-hbase.sh
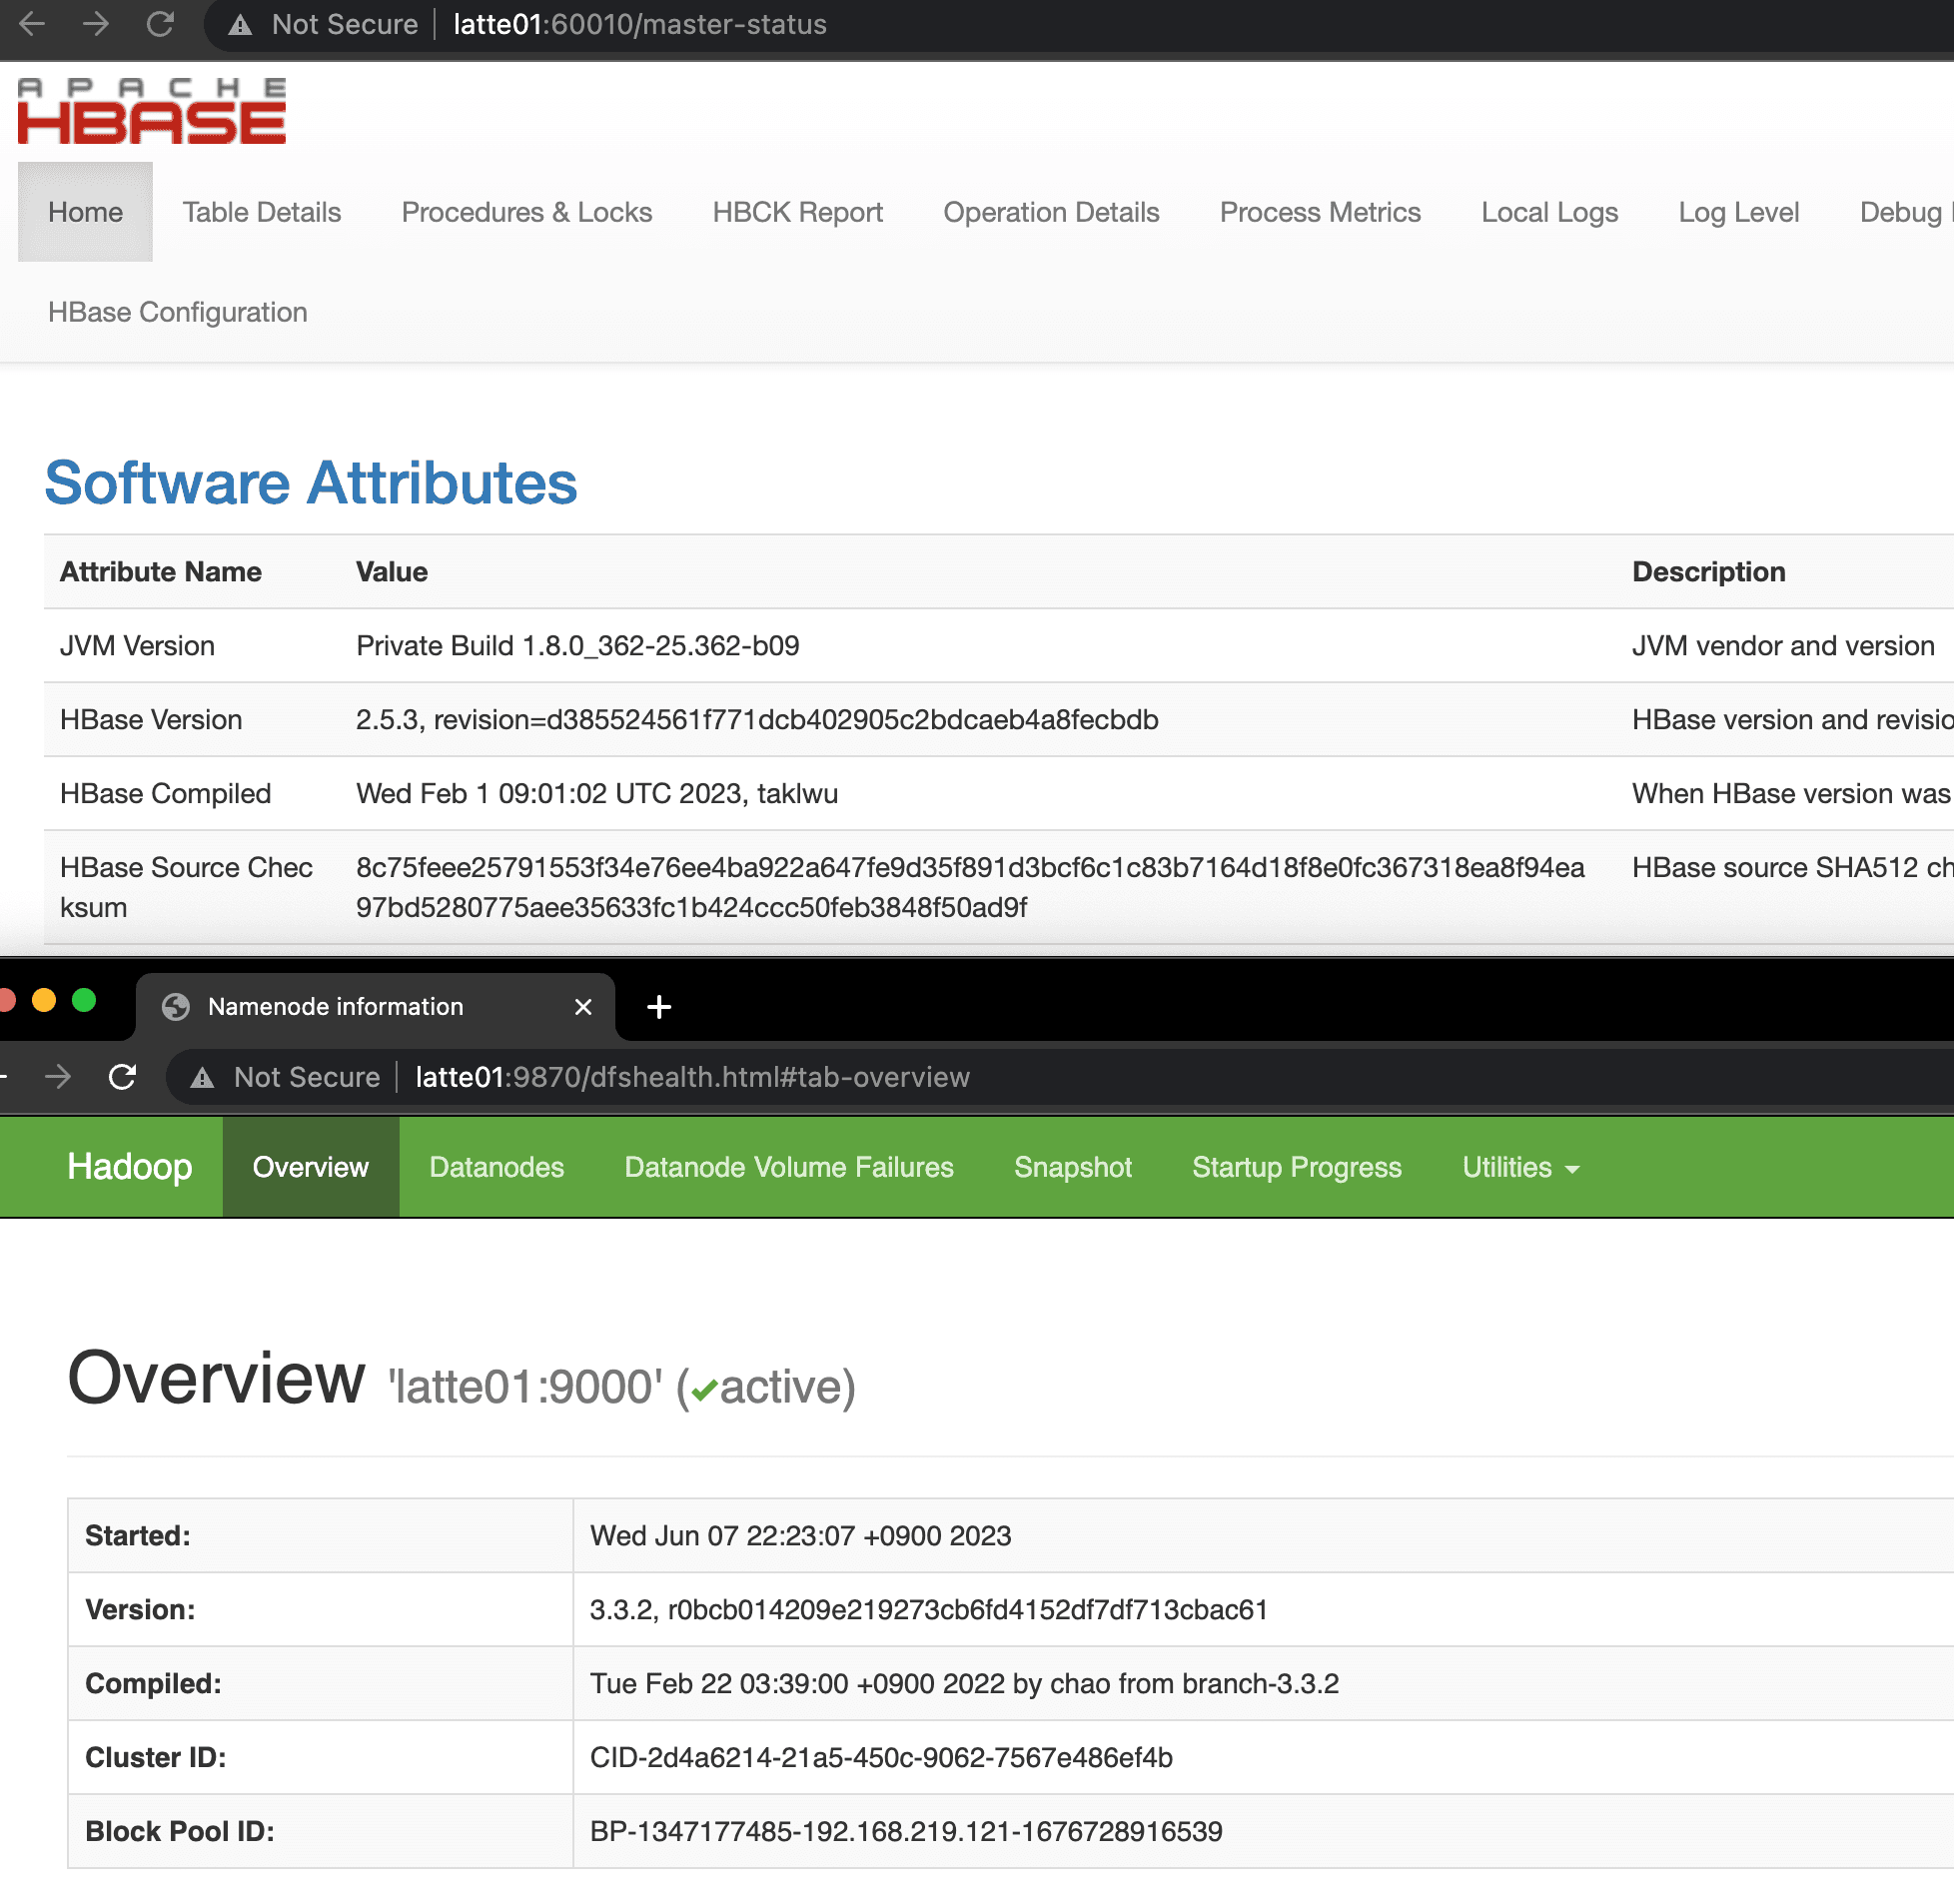
Verifying HBase is Running
Access http://latte01:16010 to check the HBase status.