Split View: Spring Boot를 활용한 간단한 MVC web app 만들어보기
Spring Boot를 활용한 간단한 MVC web app 만들어보기
Spring Boot를 활용하여 MVC 구조를 가지는 web application을 만들어보도록 하겠습니다. 예전 (JSP 시절)에는 M(Model), V(View), C(Controller)의 구분 없이 View에서 모든 로직을 처리하던 시절이 있었다고 합니다. 간단한 페이지라면 이 구조도 상관이 없겠지만, 복잡한 web의 경우 Jsp 문법으로 작성된 웹페이지 파일 하나가 수천줄은 거뜬히 넘어가게 되고 이에따라 시간이 지나면서 기능 추가나 유지보수가 힘들게 됩니다. 이 때문에 현재는 예전 Model1(MV) 구조보다는, View와 Controller를 분리한 MVC패턴으로 개발하게 됩니다.
이번 포스팅에서는 지난번 Simple Spring Boot Application 만들기 에서 만들었던 프로젝트에 hello-mvc controller를 추가하여 Spring Boot에서는 MVC 구조를 어떻게 구현하는지 알아보도록 하겠습니다.
Hello web page
Hello Controller 수정
HelloController.java에 아래와 같은 helloMvc 함수를 정의합니다. controller가 hello-template 이라는 문자열을 return하게 되면 Spring의 viewResolver가 template 파일에서 해당 문자열과 일치하는 template을 찾아 줍니다.
    @GetMapping("hello-mvc")
    public String helloMvc(@RequestParam("name") String name, Model model){
        model.addAttribute("name", name);
        return "hello-template";
    }
hello-template.html 수정
hello-template.html 파일을 아래와 같은 내용으로 생성합니다.
<!DOCTYPE html>
<html xmlns:th="http://www.thymeleaf.org">
<head>
    <meta charset="UTF-8">
    <title>Hello template</title>
</head>
<body>
<p th:text="'hello ' + ${name}" >hello! empty</p>
</body>
</html>
hello-mvc web page 확인
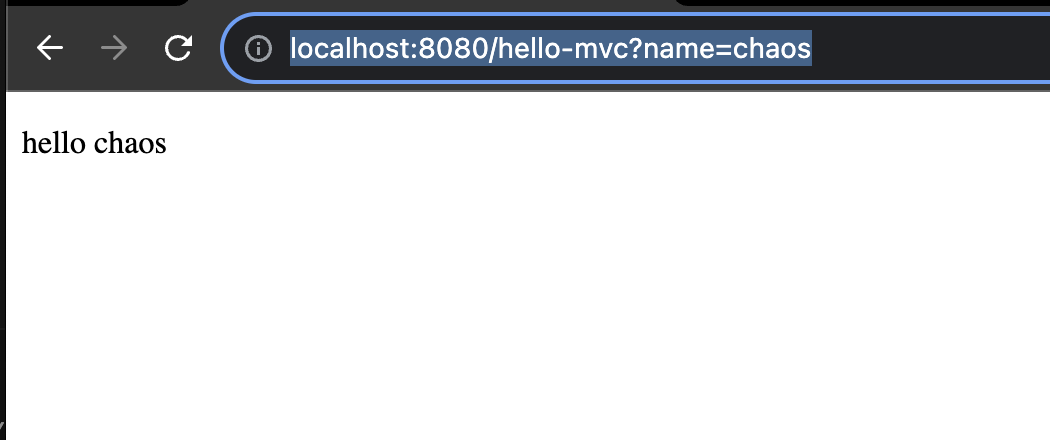
Spring 을 재시작 한 뒤, localhost:8080 뒤에 hello-mvc url에 접근하여 'name' parameter로 'chaos'를 전달하면 (ex http://localhost:8080/hello-mvc?name=chaos) Controller가 이 정보를 view에 전달하고 우리가 예상했던 hello chaos가 아래처럼 출력되는 것을 확인할 수 있습니다. chrome 에서 f-12 버튼을 눌러 페이지 소스를 확인하면, html이 잘 생성된 것을 확인할 수 있습니다.
Hello API
Hello Controller 수정
HTML 파일을 return해줘야 할 상황도 있지만, HTML이 아닌 Json data만 Return하는 API만 제공하는 경우에는 어떻게 해야할까요?
HelloController.java에 아래와 같은 Hello 라는 객체를 정의합니다.
        static class Hello{
        private String name;

        public String getName() {
            return name;
        }

        public void setName(String name) {
            this.name = name;
        }
    }
그리고 helloApi 함수를 아래와 같이 정의합니다. 이전에는 문자열을 리턴했지만, 이번에는 객체를 리턴합니다. 이번에는 @ResponseBody를 붙여주었고 문자열이 아닌 객체를 리턴했기 때문에 viewResolver 대신 HttpMessageConverter와 이 내부의 JsonConverter(MappingJackson2HttpMessageConverter)가 동작합니다. 이렇게 하면 HTTP Body에 해당 객체가 json 형식으로 담겨서 사용자에게 Return됩니다.
    @GetMapping("hello-api")
    @ResponseBody
    public Hello helloApi(@RequestParam("name") String name){
        Hello hello = new Hello();
        hello.setName(name);
        return hello;
    }
hello-api 작동 확인
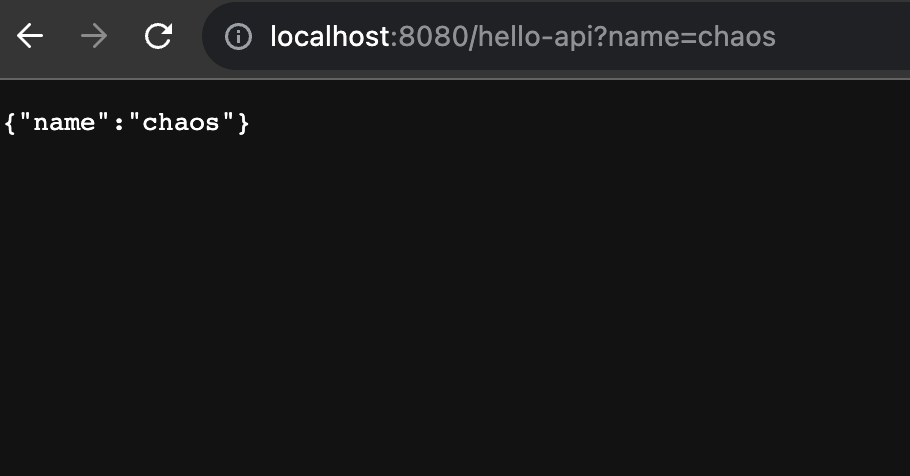
localhost:8080 뒤에 hello-api url에 접근하여 'name' parameter로 'chaos'를 전달하면 이번에는 html형식이 아닌, Json 타입의 데이터가 리턴된 것을 확인할 수 있습니다.
References
- 김영한님의 인프런 강의: 스프링-입문-스프링부트
Building a Simple MVC Web App with Spring Boot
Let's build a web application with an MVC structure using Spring Boot. In the past (during the JSP era), there was a time when all logic was handled in the View without separating M (Model), V (View), and C (Controller). While this structure might be fine for simple pages, for complex web applications, a single webpage file written in JSP syntax could easily exceed thousands of lines, making feature additions and maintenance increasingly difficult over time. This is why modern development uses the MVC pattern, which separates the View and Controller, rather than the older Model1 (MV) structure.
In this post, we will add a hello-mvc controller to the project we created in the previous post Creating a Simple Spring Boot Application and explore how the MVC structure is implemented in Spring Boot.
Hello Web Page
Modifying Hello Controller
Define a helloMvc function in HelloController.java as shown below. When the controller returns the string hello-template, Spring's viewResolver finds the matching template among the template files.
    @GetMapping("hello-mvc")
    public String helloMvc(@RequestParam("name") String name, Model model){
        model.addAttribute("name", name);
        return "hello-template";
    }
Modifying hello-template.html
Create a hello-template.html file with the following content.
<!DOCTYPE html>
<html xmlns:th="http://www.thymeleaf.org">
<head>
    <meta charset="UTF-8">
    <title>Hello template</title>
</head>
<body>
<p th:text="'hello ' + ${name}" >hello! empty</p>
</body>
</html>
Verifying the hello-mvc Web Page
After restarting Spring, access the hello-mvc URL after localhost:8080 and pass 'chaos' as the 'name' parameter (e.g., http://localhost:8080/hello-mvc?name=chaos). The Controller passes this information to the view, and you can see hello chaos displayed as expected below. If you press F12 in Chrome to inspect the page source, you can confirm that the HTML has been properly generated.
Hello API
Modifying Hello Controller
There are situations where you need to return an HTML file, but what about cases where you only need to provide an API that returns JSON data instead of HTML?
Define a Hello object in HelloController.java as shown below.
        static class Hello{
        private String name;

        public String getName() {
            return name;
        }

        public void setName(String name) {
            this.name = name;
        }
    }
Then define the helloApi function as shown below. Previously we returned a string, but this time we return an object. Since we added the @ResponseBody annotation and returned an object instead of a string, the HttpMessageConverter and its internal JsonConverter (MappingJackson2HttpMessageConverter) are invoked instead of the viewResolver. This way, the object is serialized as JSON in the HTTP body and returned to the user.
    @GetMapping("hello-api")
    @ResponseBody
    public Hello helloApi(@RequestParam("name") String name){
        Hello hello = new Hello();
        hello.setName(name);
        return hello;
    }
Verifying hello-api
Access the hello-api URL after localhost:8080 and pass 'chaos' as the 'name' parameter. This time, you can confirm that the data is returned in JSON format rather than HTML format.
References
- Kim Young-han's Inflearn course: Spring Introduction - Spring Boot
Quiz
Q1: What is the main topic covered in "Building a Simple MVC Web App with Spring Boot"?
Building a simple MVC web app with Spring Boot
Q2: What is Modifying Hello Controller?
Define a helloMvc function in HelloController.java as shown below. When the controller returns the
string hello-template, Spring's viewResolver finds the matching template among the template files.
Q3: Explain the core concept of Modifying hello-template.html.
Create a hello-template.html file with the following content.
Q4: What are the key aspects of Verifying the hello-mvc Web Page?
After restarting Spring, access the hello-mvc URL after localhost:8080 and pass 'chaos' as the
'name' parameter (e.g., http://localhost:8080/hello-mvc?name=chaos). The Controller passes this
information to the view, and you can see hello chaos displayed as expected below.
Q5: How does Modifying Hello Controller work?
There are situations where you need to return an HTML file, but what about cases where you only
need to provide an API that returns JSON data instead of HTML? Define a Hello object in
HelloController.java as shown below. Then define the helloApi function as shown below.